Make a nice game out of foam poster board
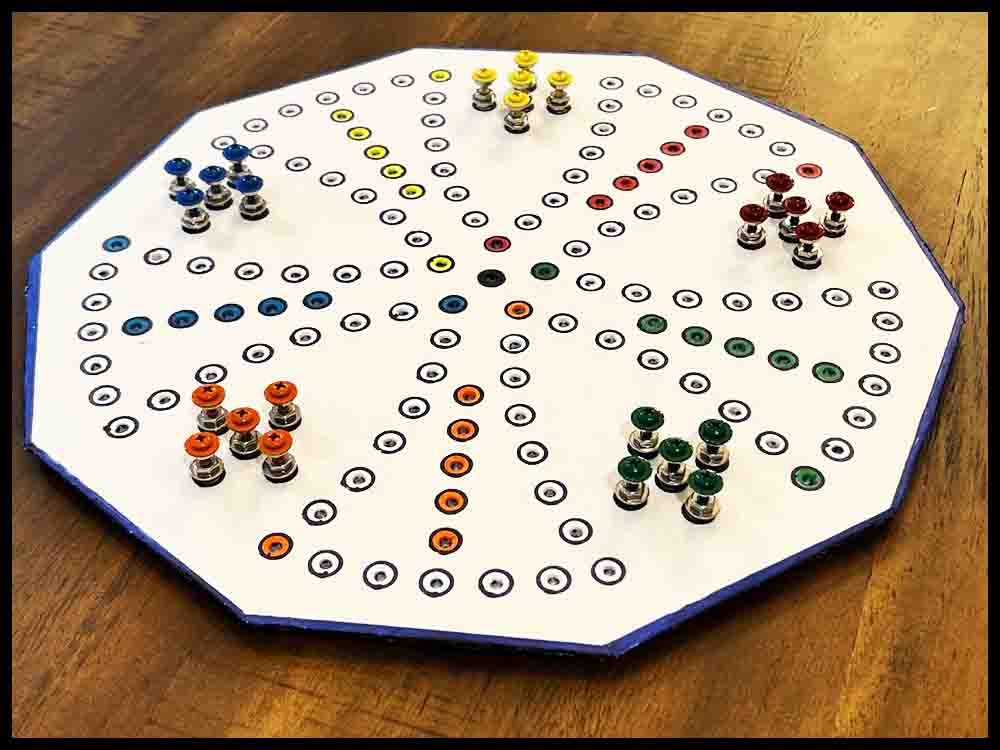
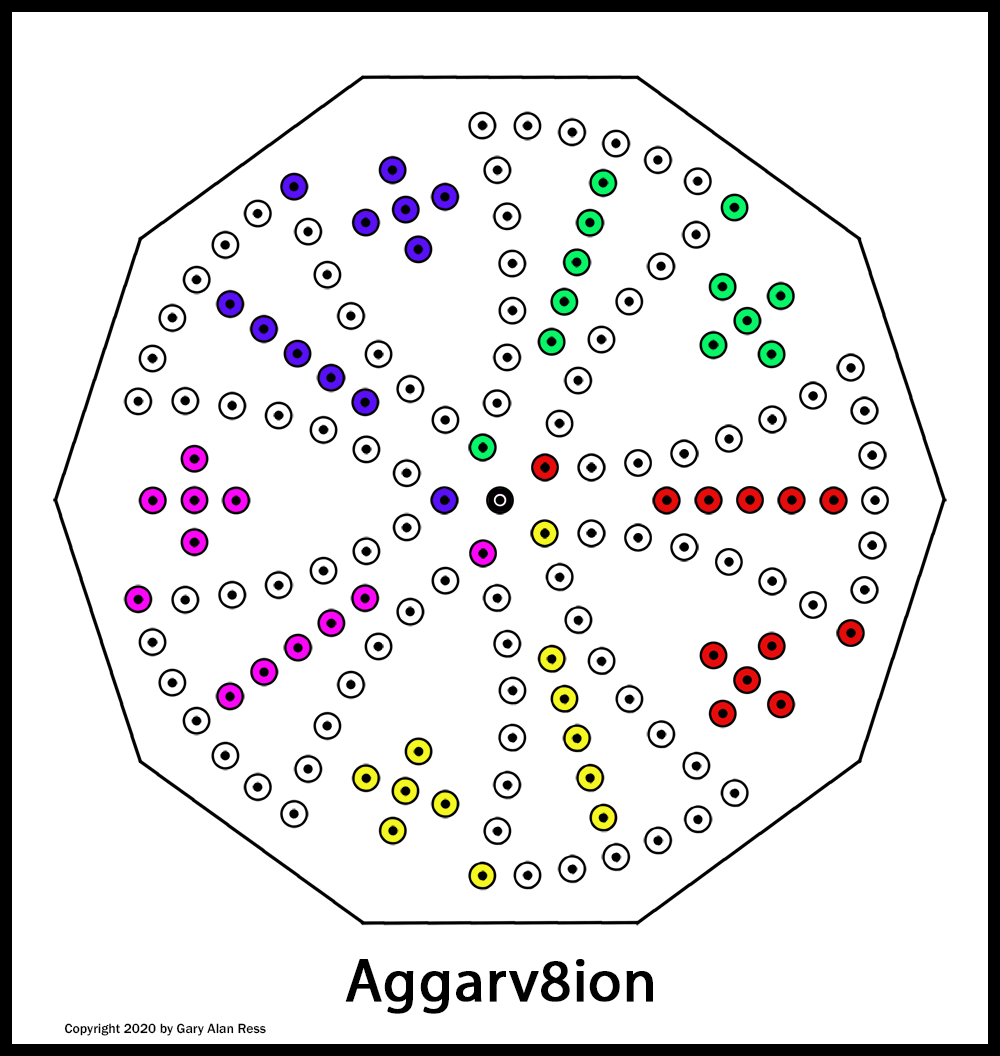
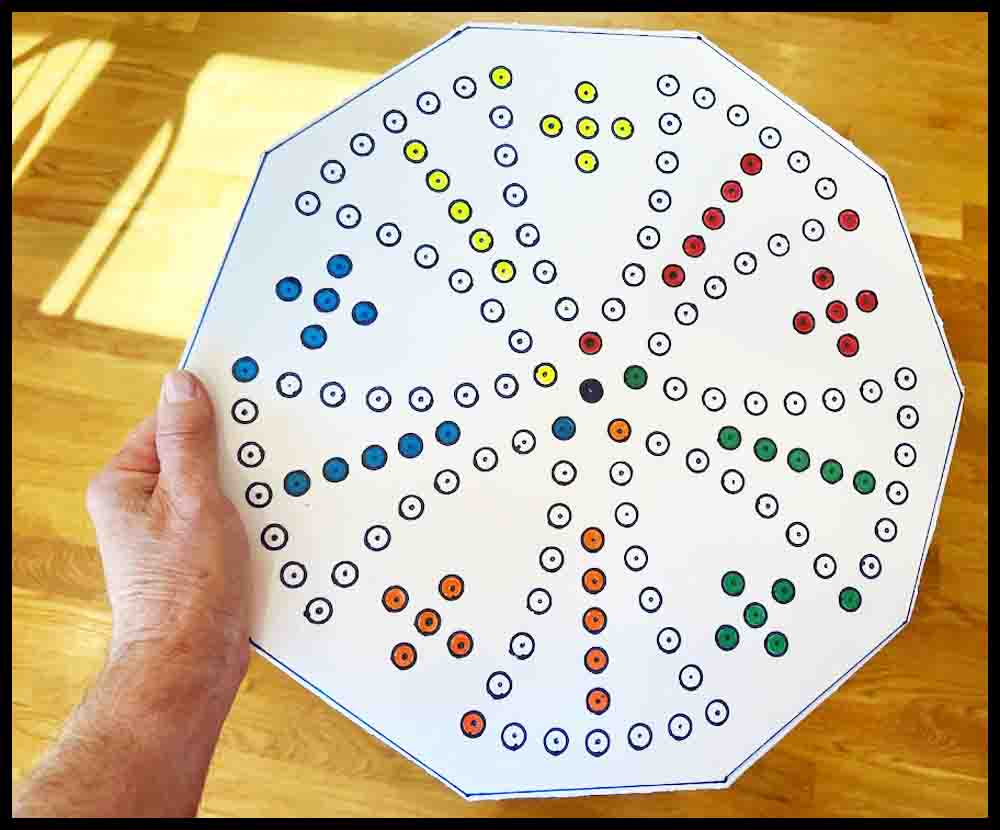
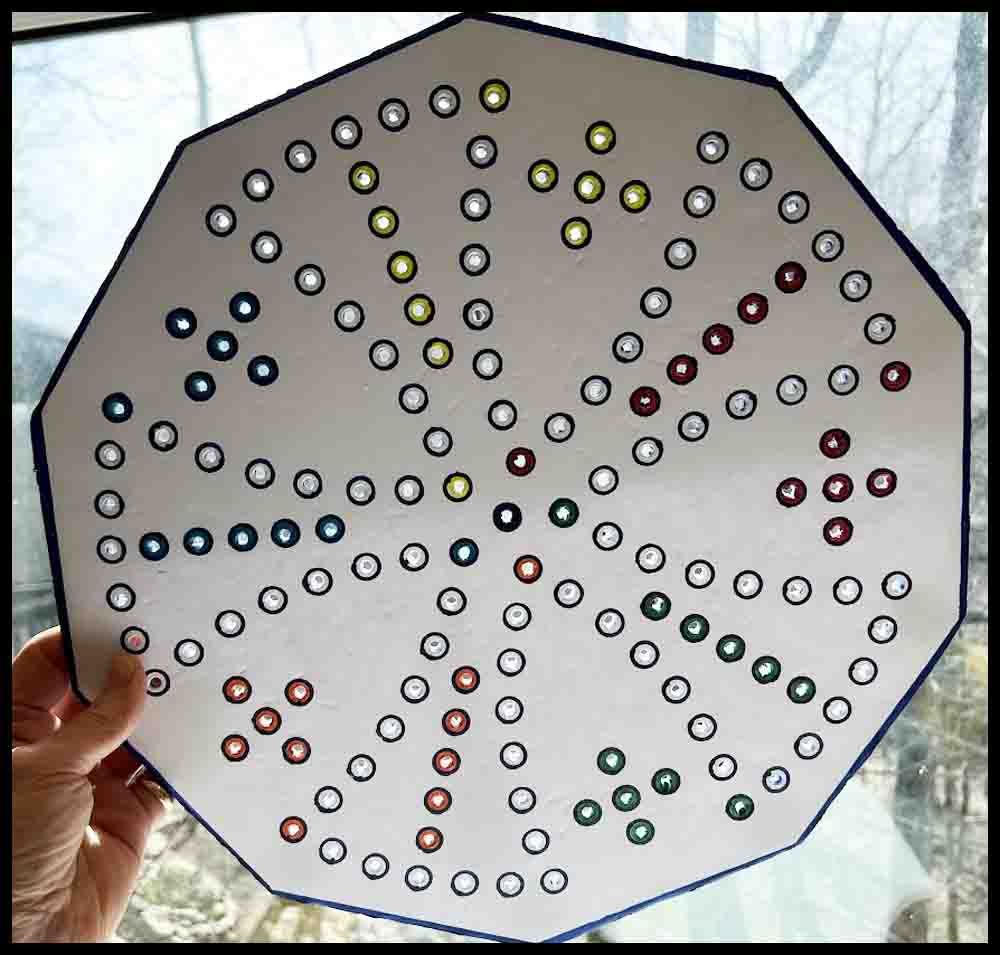
If you read the Aggarv8ion page and are eager to play the game soon, read on! In just a few hours or less, you can make a nice game as shown in the picture on the right without needing to use any power tools. The basic items needed are a printer, a sheet of heavy cardstock, and a piece of foam poster board. With a few piercing tools you probably have around the house and some permanent markers, you’ll soon be in business. Make some game pieces and obtain two 8-sided dice and you’ll be ready to play.
Making an Aggarv8ion game is very similar to the instructions for making an Octosory game. I suggest reading or at least scanning the instructions for both games first to familiarize yourself with the procedures of making a game out of foam poster board or wood. The instructions for making an Aggarv8ion game out of wood are further down this page.
Follow the directions below to make an Aggarv8ion board out of foam poster board.
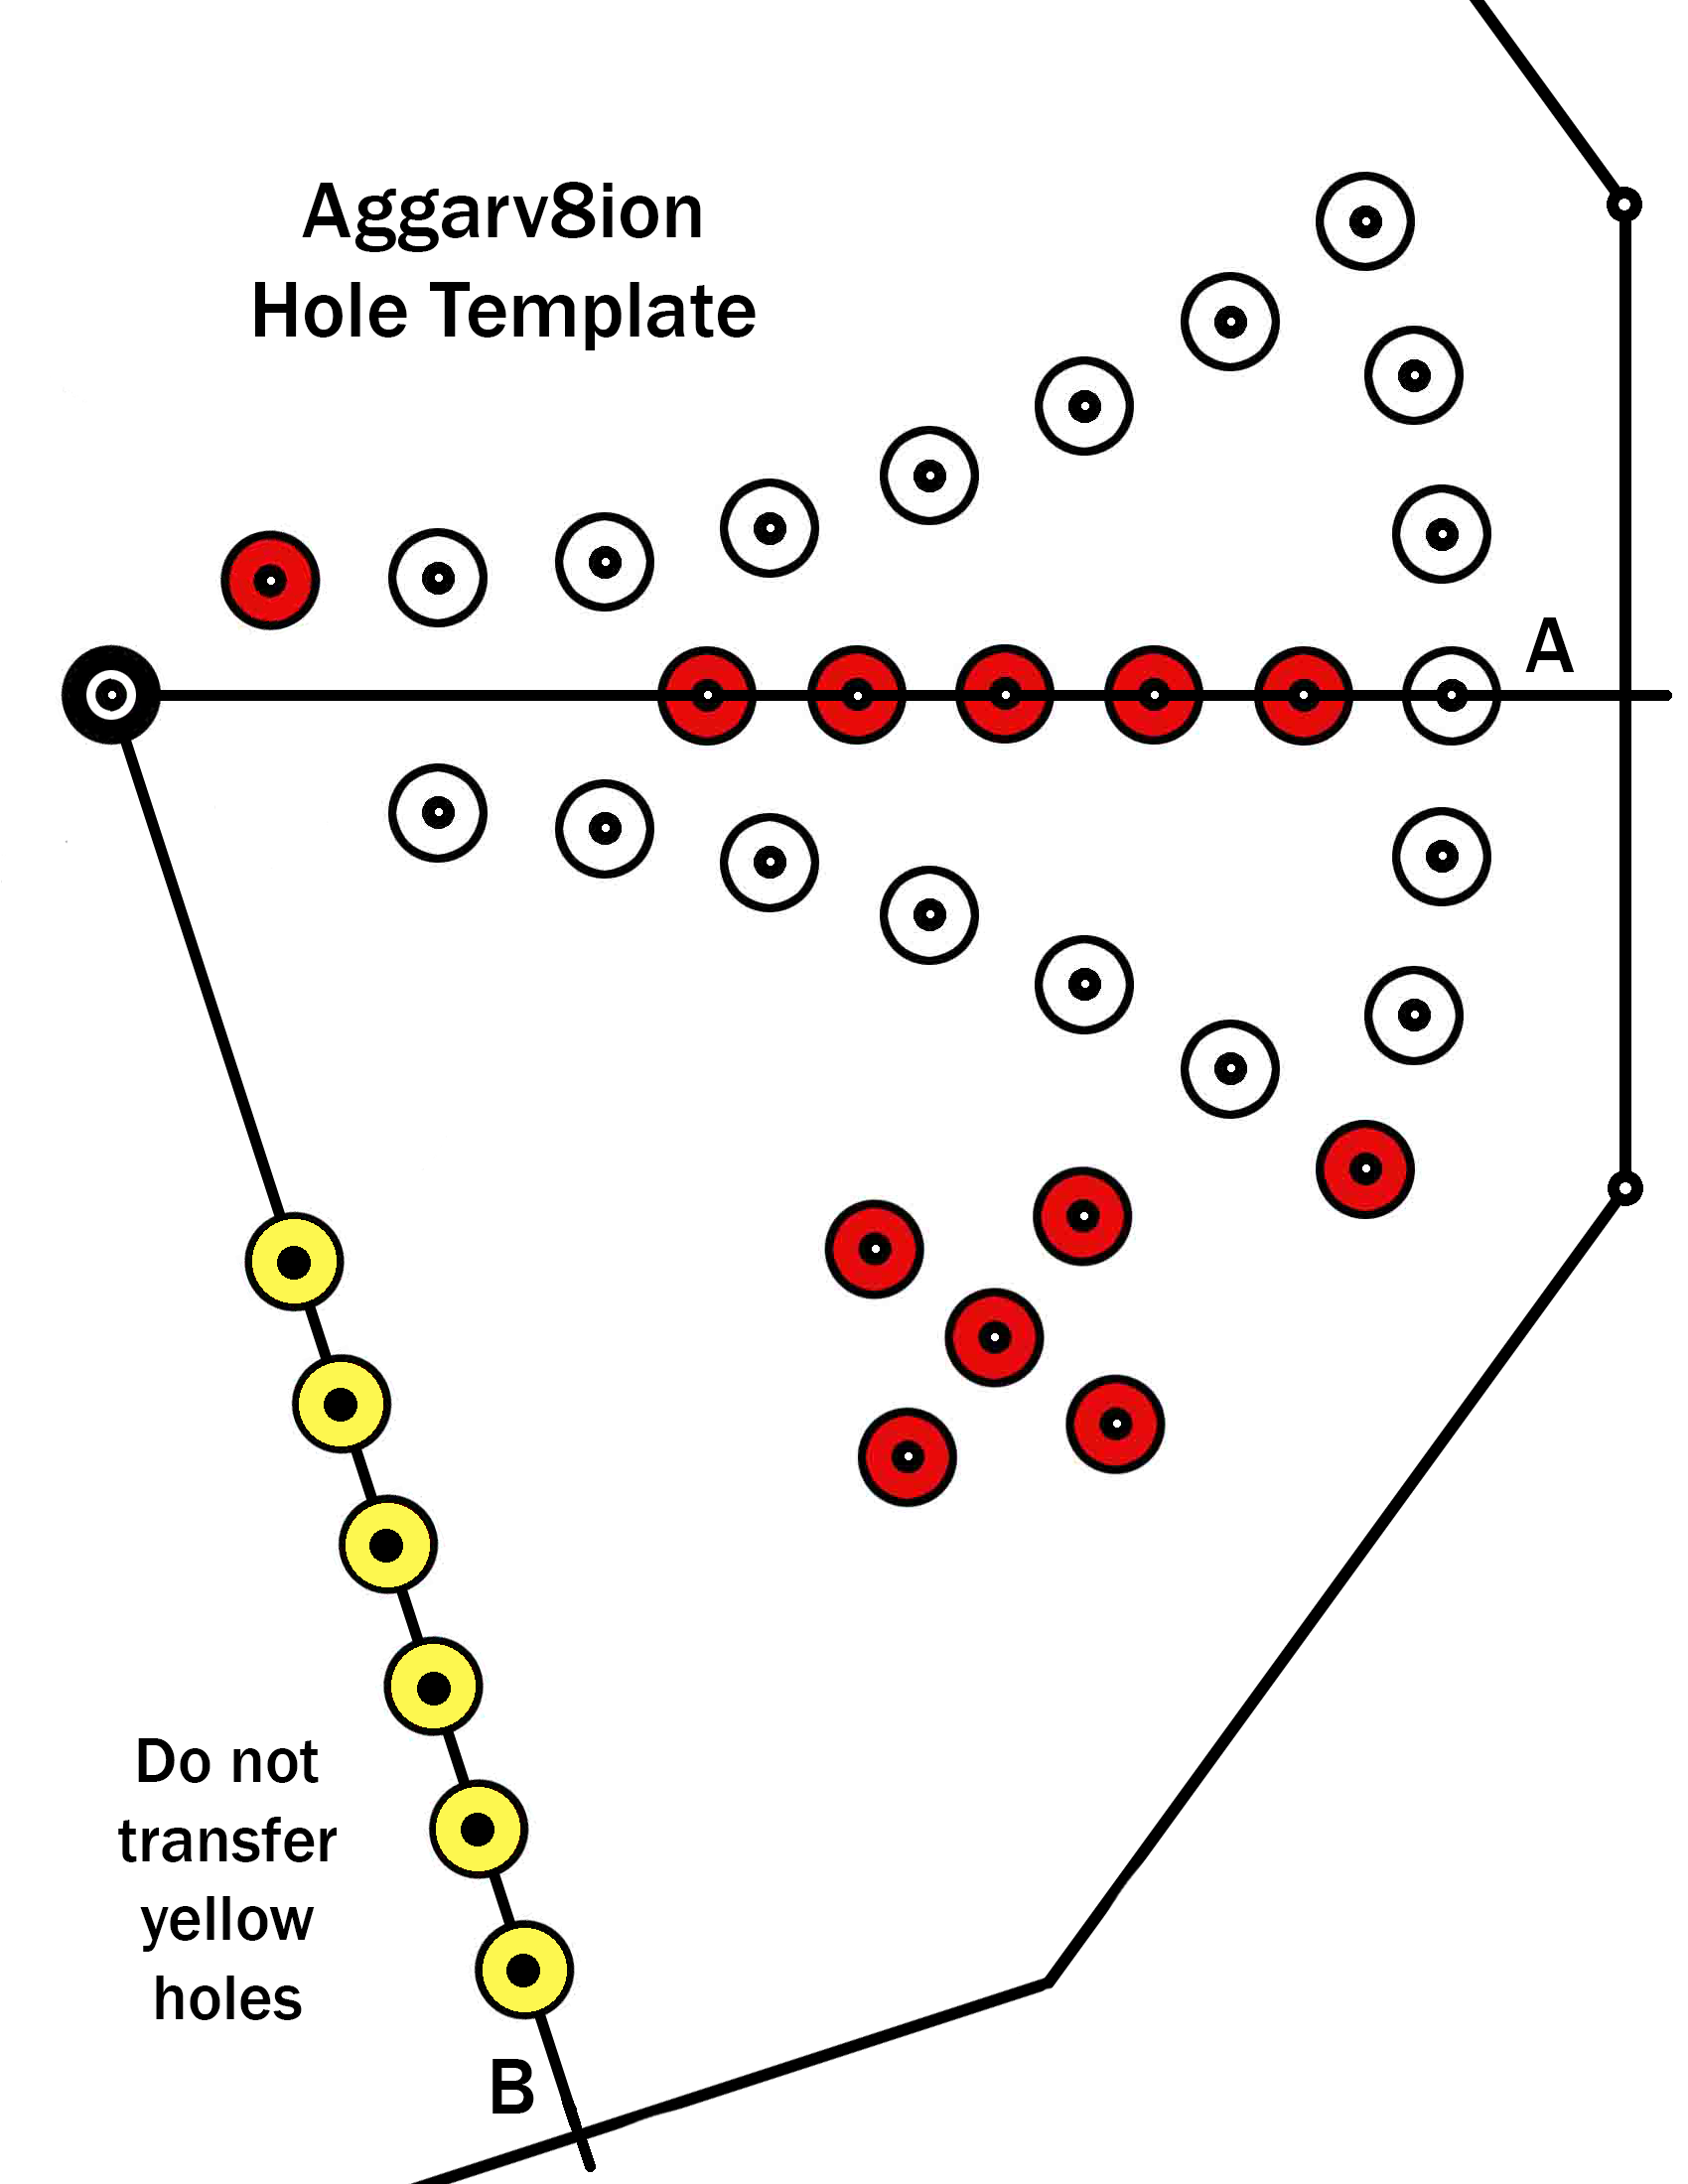
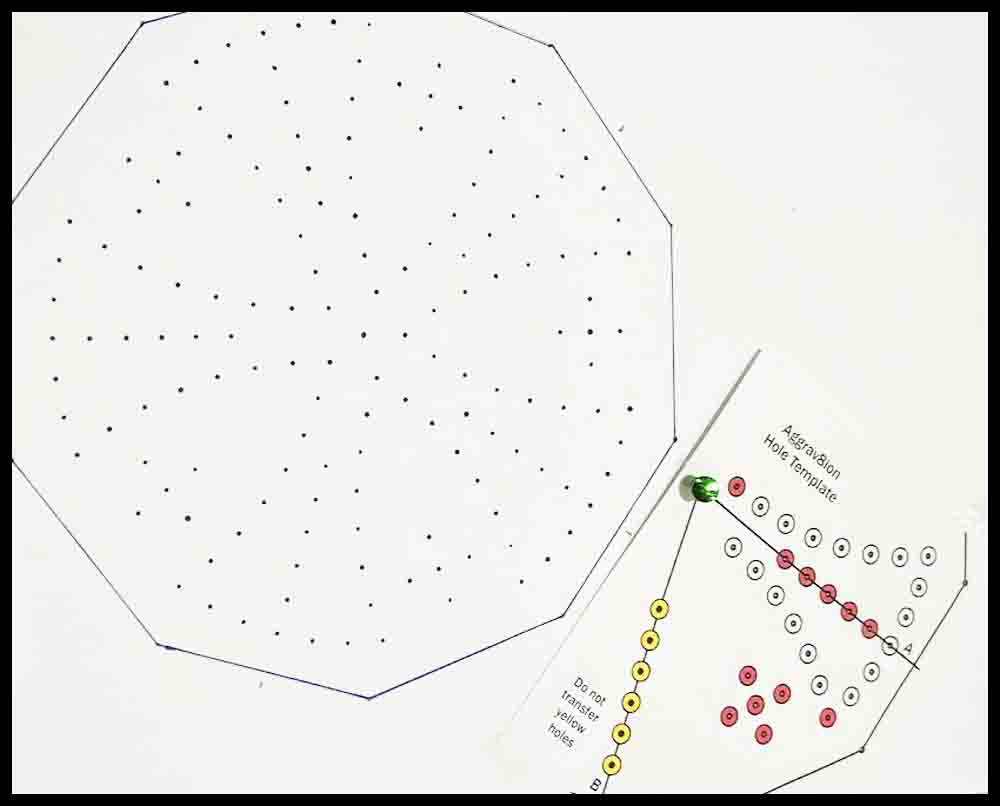
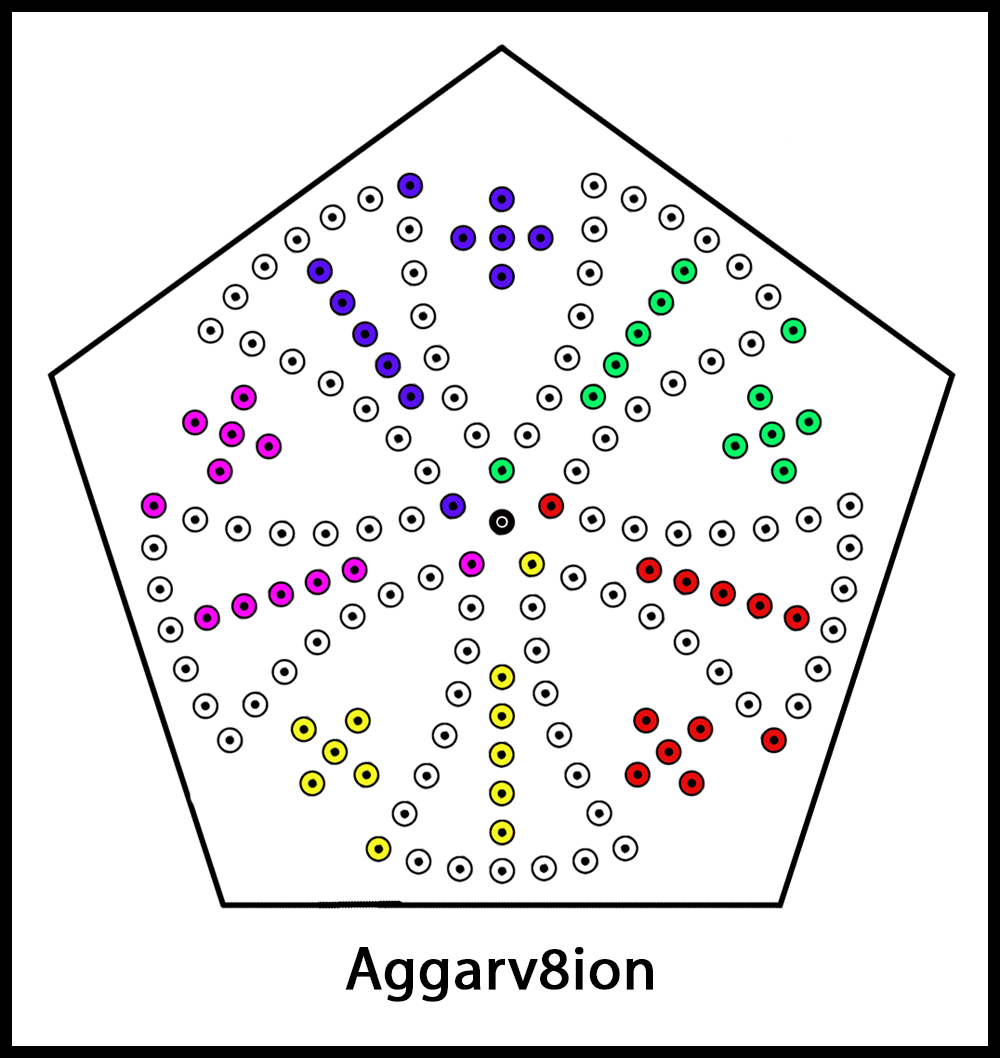
1. Click the image on the right and save it to a hard drive. Printout the image on some thick card stock. This is a template that will be used for transferring the hole locations.
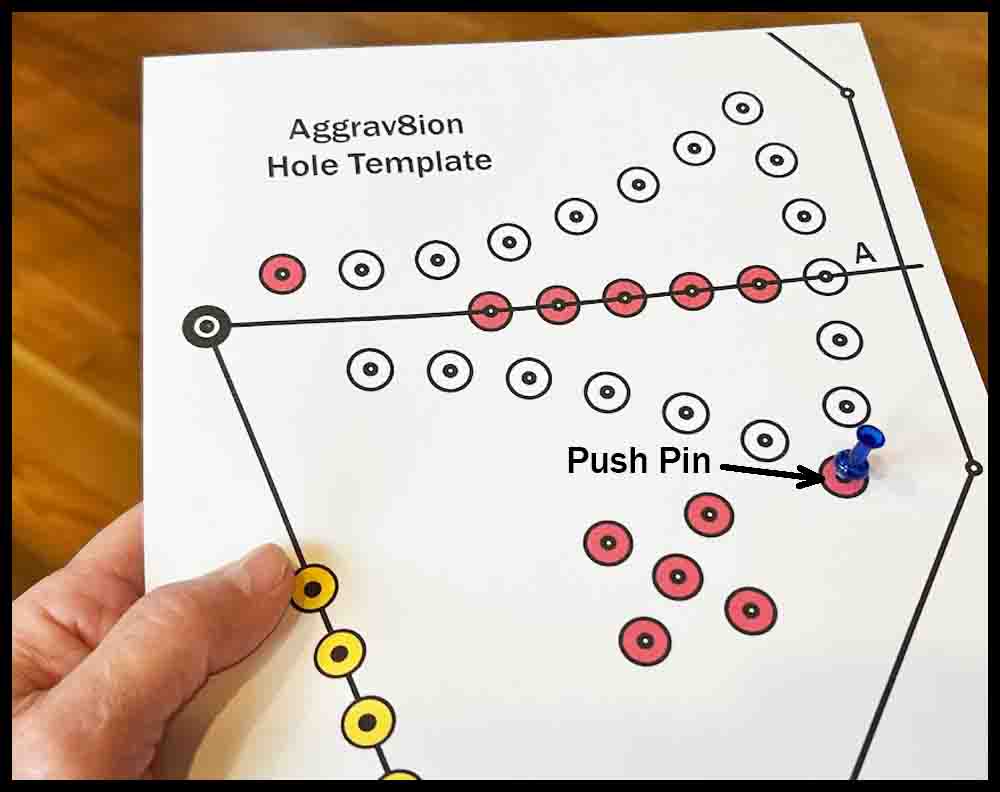
2. Place the template on a thick piece of cardboard or scrap poster board to avoid putting scratches on your table. Use a push pin to pierce all the holes in the template except for the yellow ones. (see section below concerning piercing tools).
3. Open up the two outside holes using a 1/8″ diameter tool. These holes will be transferred later with a pencil to mark the outside edge in Step 15.
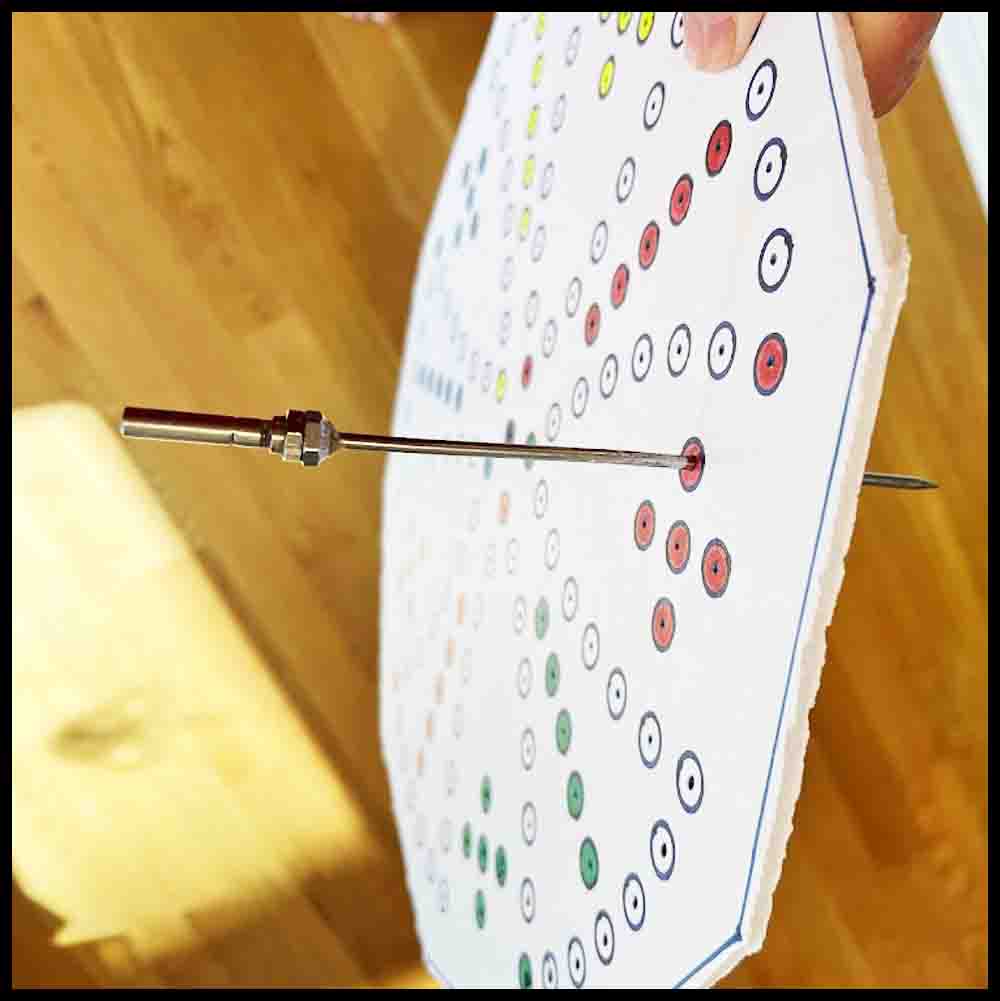
Read A-D in the section below to familiarize yourself with different piercing tools.
Click the pictures for a bigger view.
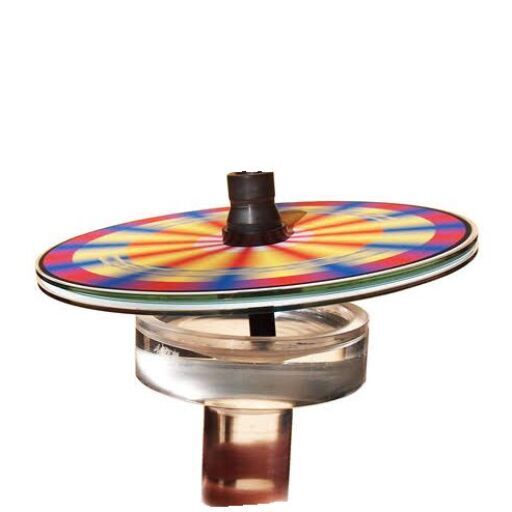
A. The first tool in the top picture is a push pin. It works great for piercing the initial holes through templates made out of cardstock used for making Octosory and Aggarv8ion. For Rainbow Raceway and Orbital Summation, push pins are used for the initial mark in the image of the game that was printed out.
B. The metal scribe shown below the pushpin is a great choice to use as a center punch on wooden bases that have been pre-marked with a push pin. The enlarged view of the tip is just to show this particular tool. The important part is the nice sharp point.
C. The third tool from the top is a homemade scribe I have used for years. This is the perfect size (1/8″ diameter) for opening up the small holes initially made in all of the foam boards. The sharp point assures the hole location is picked up accurately. Search for a similar pointed awl or scribe in a hardware store or use a screwdriver like the small one described below in D.
D. The Phillips screwdrivers offer three different sizes for piercing clearance holes. The small one (.120 dia.) can be used the same way as the homemade scribe above. The point is small enough to pick up the initial small holes made in the poster board, although it might be helpful to grind more of a point on it with a belt sander.
E. Two games will use a slightly smaller diameter piercing tool. Orbital Summation and the smaller version of Rainbow Raceway use #6-32 screws to make the game pieces. The tools shown in the lower picture were both made from drill bits found around the garage. The shorter drill uses a wire nut for a handle. On the longer carbide drill I found a plastic drywall insert to use as a handle. Both handles are taped on with duct tape.


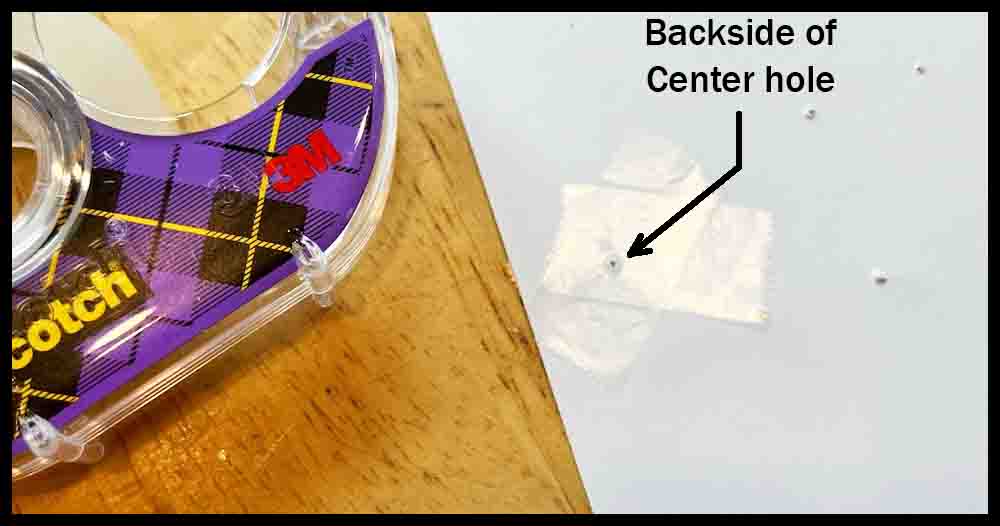
4. To strengthen the center hole that the template pivots on, stick a couple of pieces of clear tape across the hole. Flip the template over and re-pierce the center hole with a push pin.
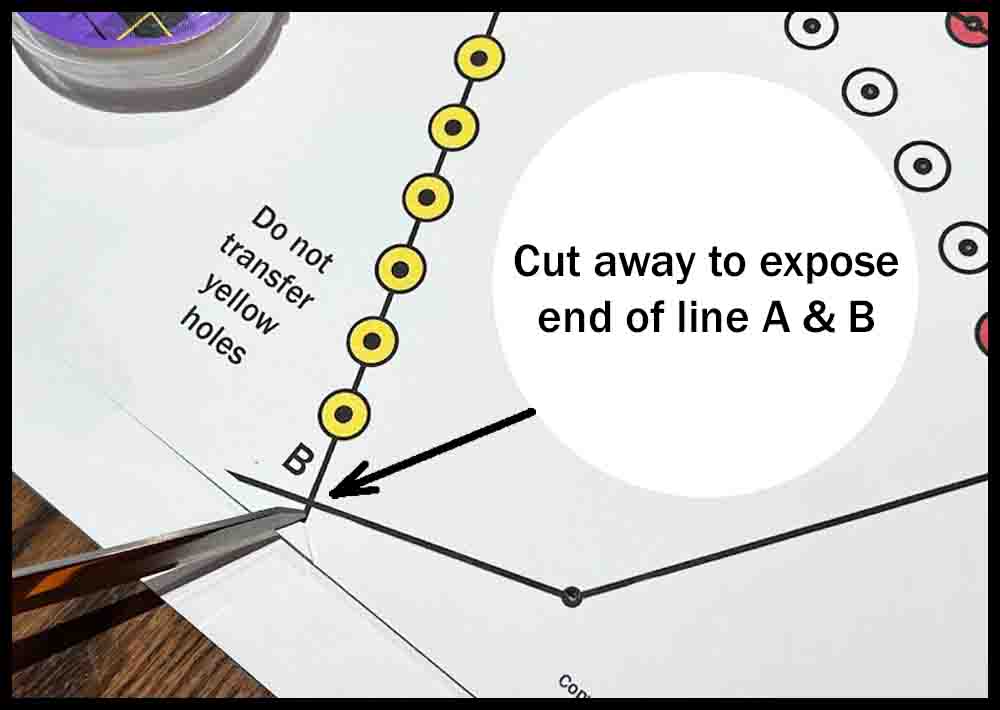
5. Use scissors to trim a little triangle from the template in two places as shown. This will expose the ends of lines A and B.
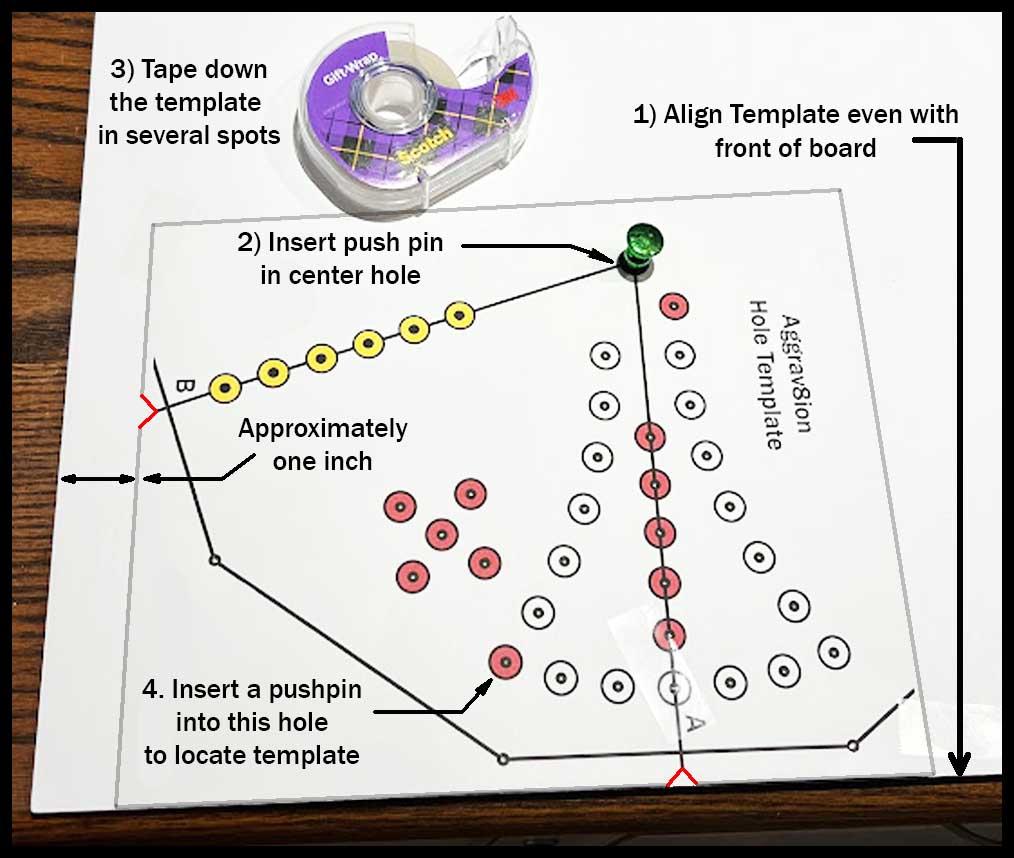
6. Tape down the template in a couple of places as shown in the far right picture below on a big piece of foam poster board at least 17 1/2″ square. The template will rotate around this board to five different locations 72 degrees apart. This board will be trimmed later to the final size. Carefully insert the pushpin vertically in the center pivot hole. Insert another push pin through the red hole marked in the drawing to make a temporary location hole. This will be the starting position for piercing the holes. In the next step rotation marks will be added.
Trial run to add rotation marks and check for accuracy.
7. Sometimes printers may not be entirely accurate when it comes to producing the exact distances and angles as drawn. This is the point in the construction process where you will make a trial run to test for accuracy, rotating the template around the board to five different locations before actually transferring holes.
8. Make a light pencil mark on the board exactly at the end of Line A with the template in the starting position (Step 6), then another mark at the end of Line B. The original mark made at the end of Line A will not change, even if errors are found. These marks will be erased later, so make them accurate but light.
9. Remove the pushpin from the red locating hole that was inserted in Step 6. Do not reinsert the push pin for the rest of the trial run. Rotate the template clockwise 72 degrees until Line A on the template lines up with the mark that you made at Line B in the starting location.
10. Make another mark at the end of Line B, then repeat this process each time you rotate the template 72 degrees clockwise, lining up Line A with a mark made at Line B.
After rotating the template four times, compare the last mark made at Line B to the original mark made at Line A . If it lines up fairly close, then you are ready to transfer the hole locations and may skip Steps 11 and 12 . Proceed to Step 13.
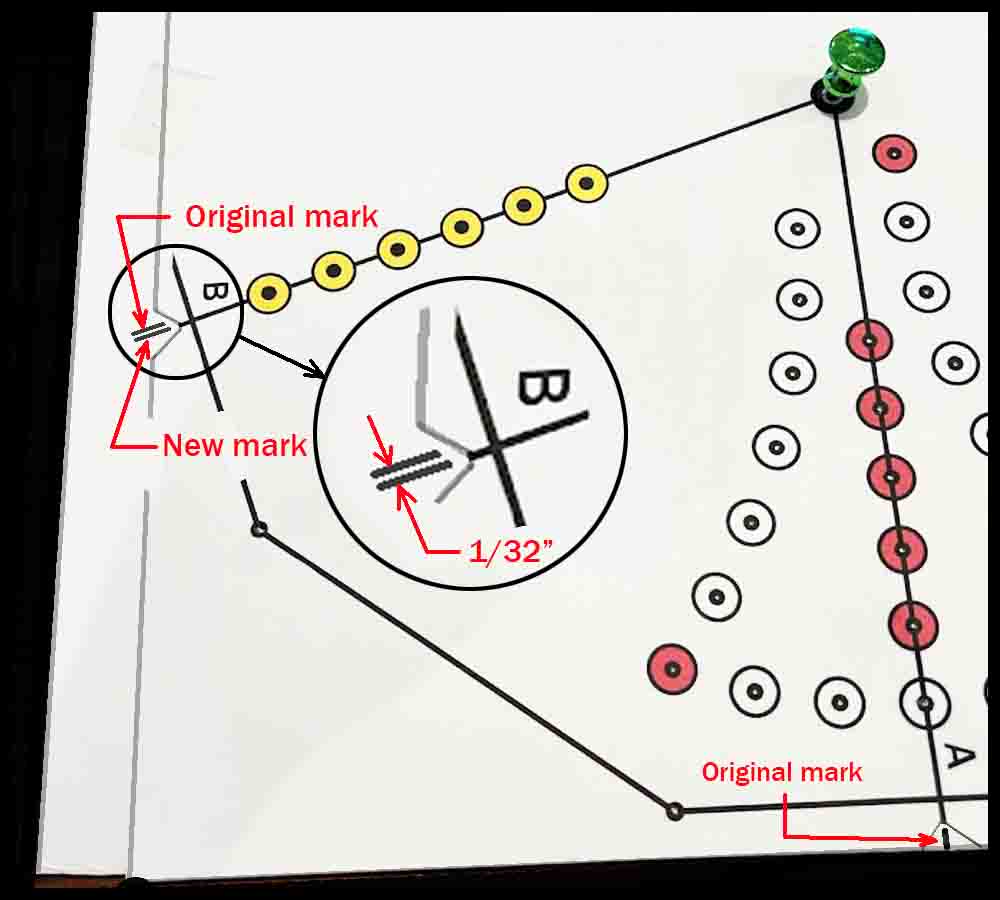
11. If the last mark made at Line B does not line up closely with the original Line A mark at the bottom, compensate for the error by making another dry run, this time rotating the template a little more or a little less each rotation, depending on which way the error occurred. To do this accurately, make new marks on the board parallel to the old ones as shown in the example below. Make these marks light so they may be erased later.
For example, if your final mark at Line B after the first trial run was 1/8″ or 4/32″ past the original mark at Line A, then the template rotated 1/32″ too far each time during the first trial run. It will have to be rotated 1/32″ less each time to correct the error. Make new marks on the board as described below next to the four you made the first time when rotating the template. Do not change the original mark at the bottom of the template. After making each new mark, erase the original one next to it.
Go to the mark at Line B (where the template was in the original position) and make a new mark 1/32″ less distance than the original mark as shown in the drawing on the right. Continuing around the board in a clockwise direction, make the next mark 2/32″ (1/16″) before the second original mark, the third 3/32″ before, and the fourth 4/32″ (1/8″) before the original fourth mark. Remember to erase the old mark after making the new one.
12. When you are confident the corrections made have solved the problem of over or under rotation, proceed with Step 13 below. Don’t worry if the marks are a little bit off. It won’t show when all the holes are pierced.
Transferring the holes.
13. Return the template to the original position and insert the pushpin carefully through the lower red hole used previously to locate the template. Tape the template back down.
14. Use a push pin to transfer each hole into the foam board except for the two on the outside edge that mark the locations of the sides. These holes were opened up to 1/8″ diameter in Step 3.
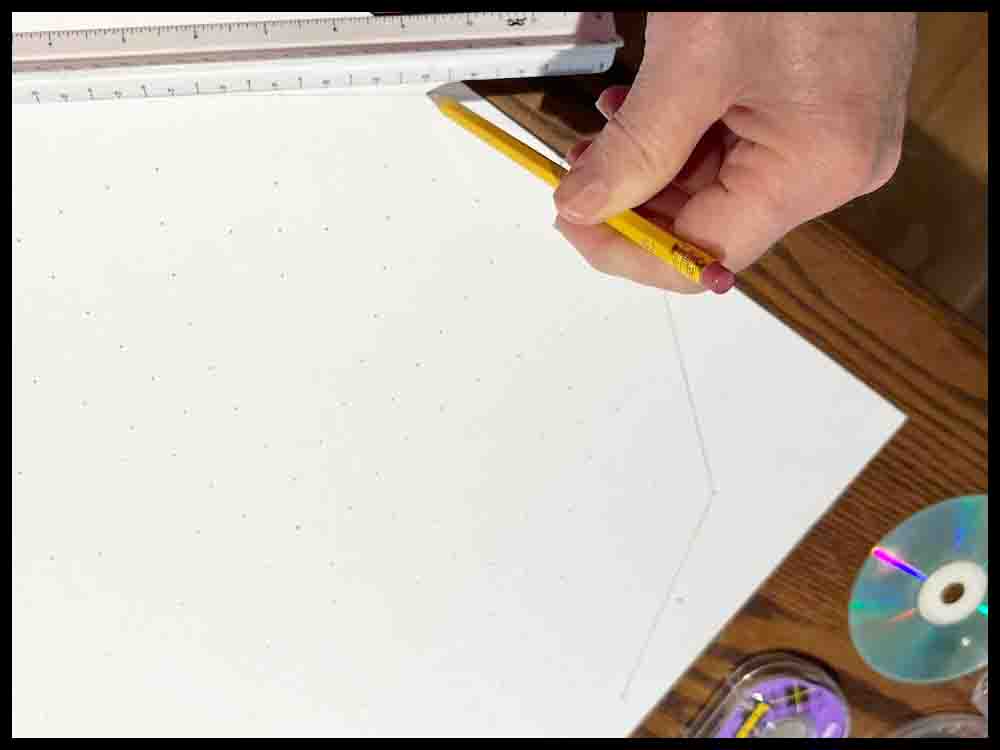
15. Using a pencil, make small circular motions in those two holes on the edge to mark the spots.
16. Rotate the template 72 degrees to the next mark made in Steps 7-10. If corrections were made after the trial run, use the new marks drawn in Steps 11-12 instead. Repeat Steps 13 and 14 three more times, locating the template with a push pin through the red hole and taping the template to the board surface in a couple of places. Make sure you use some tape that removes easily without tearing the board surface. (A total of four rotations will be made. After the last rotation, Line B will be lined up with the original mark at Line A.)
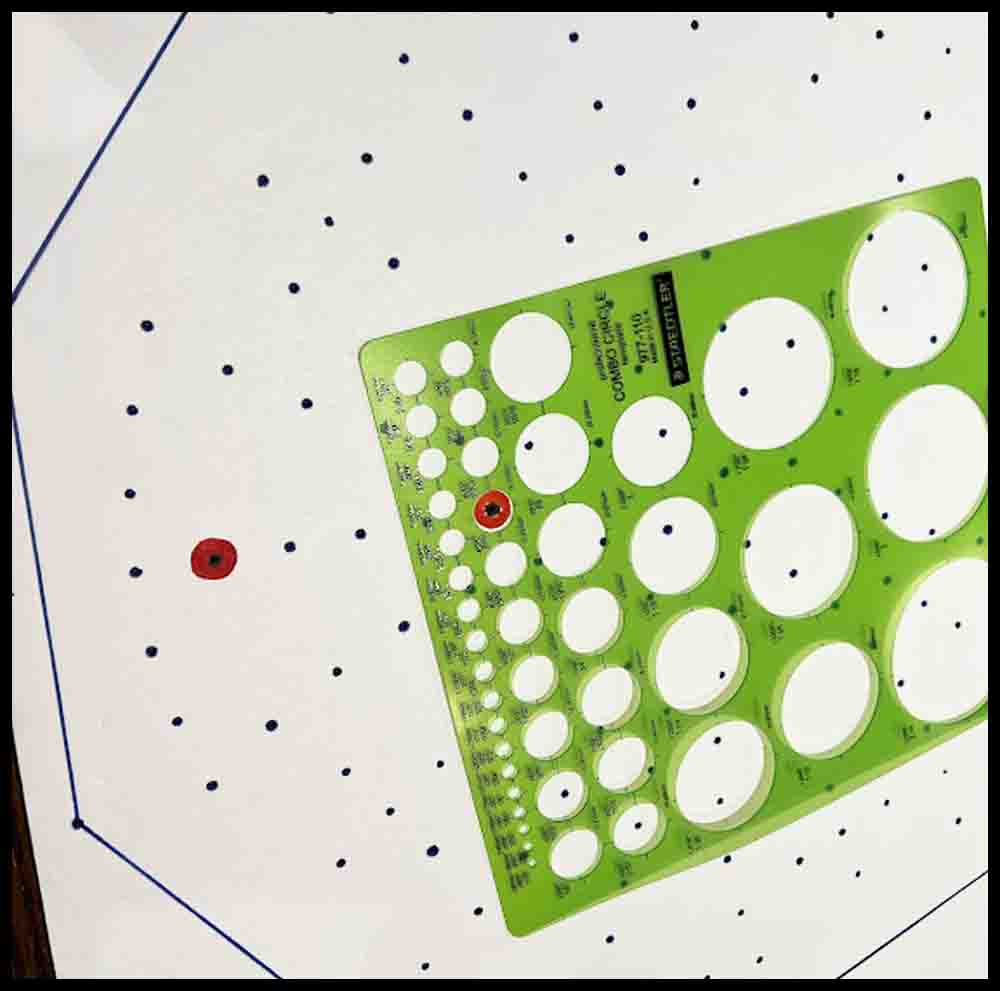
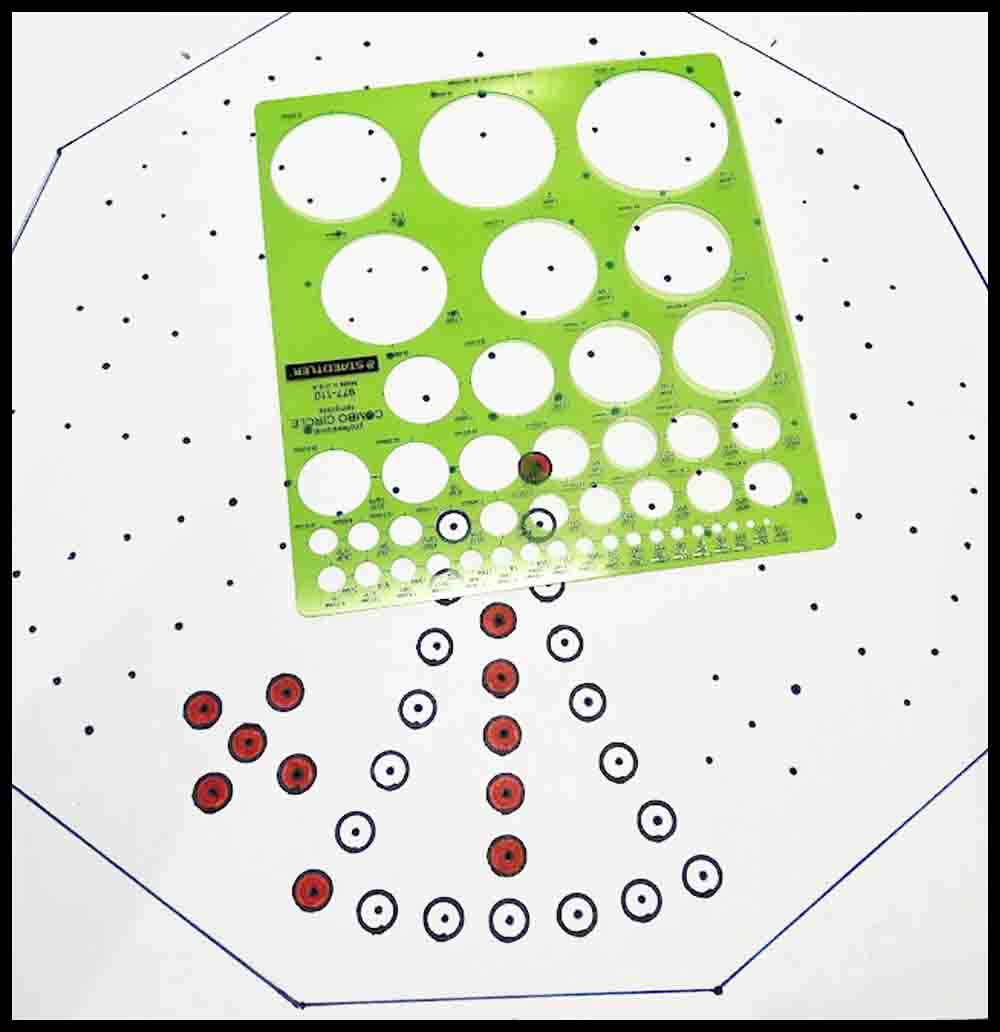
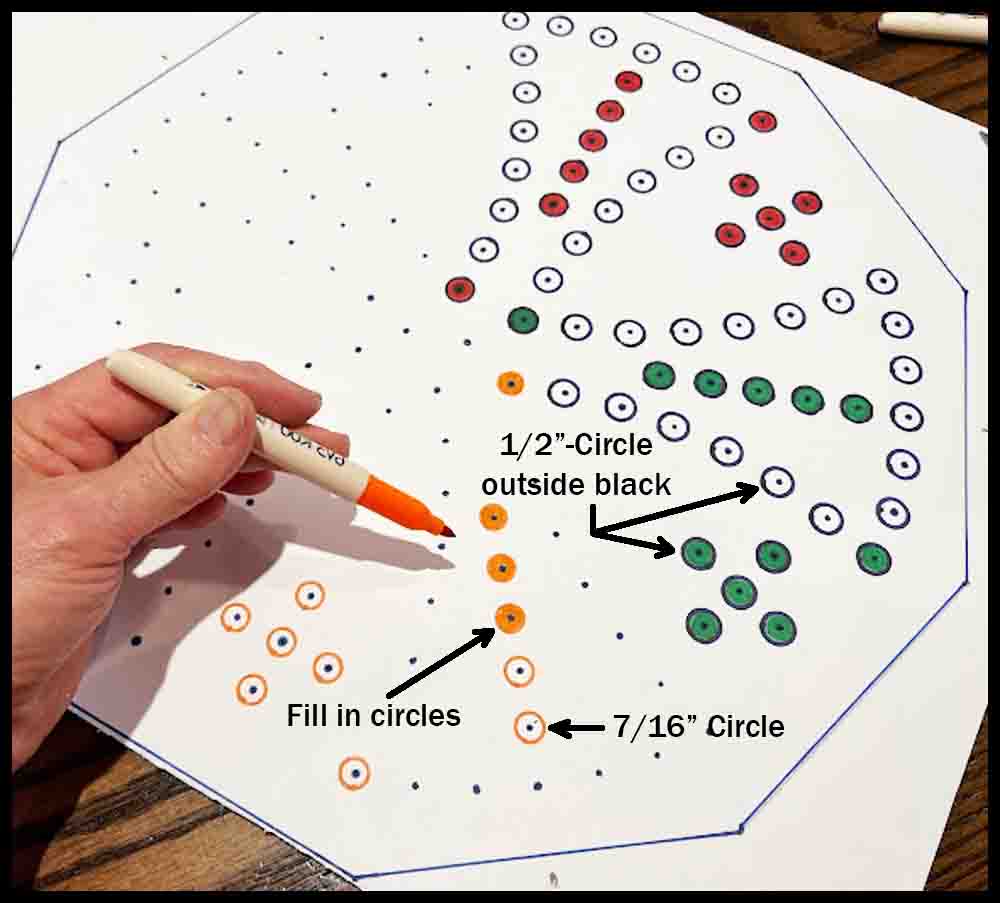
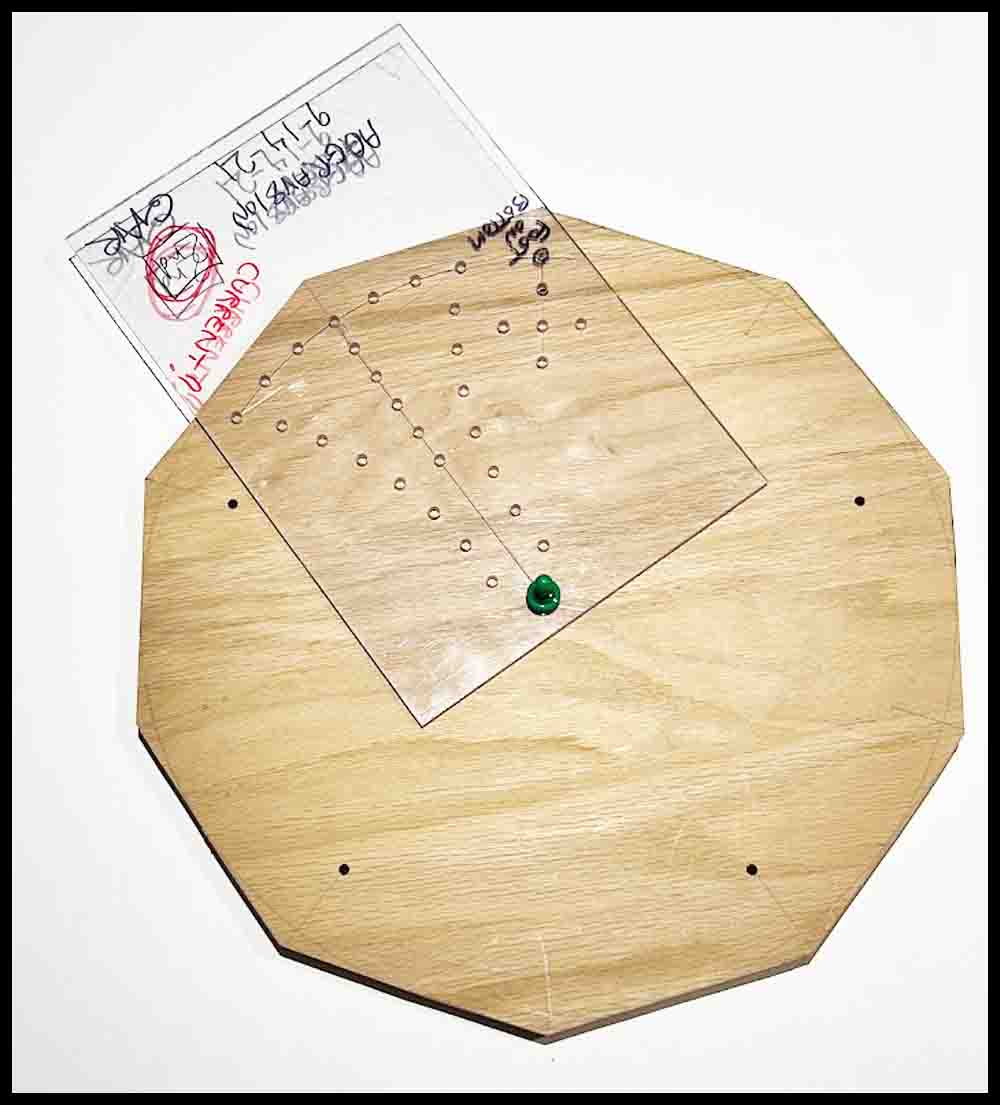
After transferring the last set of holes, remove the paper template. Use a straight edge and a pencil to connect the marks on the outside that show where the edges will be. Next, use a plastic or metal hole template and a permanent marker to circle all the tiny holes as directed. Follow the pictures for a visual guide. Click on any picture to enlarge the image.

After cutting the board to size, the last step before decorating will be to pierce all the holes to their final size.
17. When you are finished coloring all the holes, enlarge the holes in the board. Use a tapered tool such as the 1/8″ scribe shown above to pierce the pin holes. Practice on a scrap piece a few times to get comfortable with the process. As the scribe is pushed through the hole, it can be twisted and moved sideways to keep the hole in the correct location.
18. After piercing all the holes, use a tool such as the Phillips screwdriver shown above to enlarge all the holes. The diameter on that screwdriver is .198″, or a little bigger than 3/16″. This size works well with an 8-32 machine screw which will be used to make the game pieces.
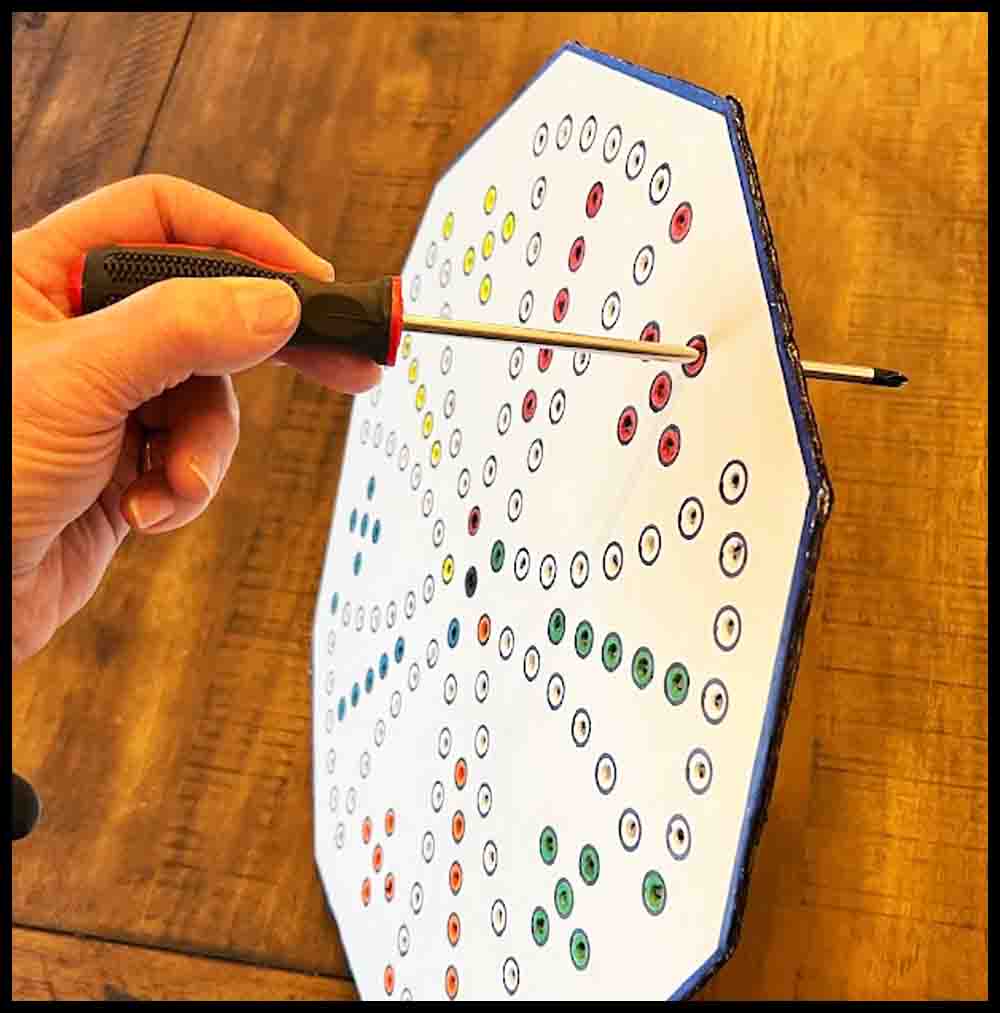

The process shown above could have been done in one step, but using the tapered scribe first before finishing with the proper sized tool allows you to correct any errors more accurately.
You’re finished! Color the edges and decorate as desired to customize your Aggarv8ion board. Adding some felt furniture sliders will keep the board off the table and protect it from soaking up any moisture. You will need to obtain two eight-sided dice and make some game pieces. The purple button will take you to a page where instructions are shown for making game pieces.
Grab some friends or family and start playing!
How to make a beautiful wooden Aggarv8ion board.
The board itself can have ten sides like the one I made and is shown here, but a five-sided board or even a circular one will look fine.

Here are four ways to lay out the dimensions when making a wooden game board for Aggarv8ion:
A. Use the paper template from the top of the page that is used for making a foam poster board game. This is probably the easiest method.
1. The instructions for the foam poster board game say to start with a piece of material 17 1/2″ square or bigger. That is to make it easy to trim to the final size. Depending on the size of the wood material you have, you can start with a smaller piece, slightly bigger than 16 inches square.
Important: Before following the next steps, spray the top of the board with at least one coat of polyurethane and let it dry. This will help stop the paint from bleeding when the counterbored holes are painted in future steps.
2. Mark the exact middle of the board with a pencil, then carefully use a push pin to mark that spot. That is where the center hole of the template will be located.
3. Print out the paper template and follow the same steps as written in the first section for transferring hole locations, except where the left side (Line B) of the template is taped down in the starting position. It does not need to be 1″ from the edge of the board. Be sure to follow Steps 7-12 in the section above to check the template for accuracy and add rotation marks. Transfer all the holes in all five stations. When transferring the hole locations, put pressure on the push pin so it makes a nice mark partway into the wood.
4. Remove the template. After removing the template, enlarge the hole locations with a center punch (or commercial scribe described above) and a hammer so that a small drill bit can be used accurately to pick up the hole locations.
5. Start all the holes with a small drill bit (somewhere around 3/32″ diameter) at least 1/8″ to 1/4′ deep.
6. Use a 3/16″ drill bit to enlarge the hole diameter. Drill all the way through the board.
7. A 1/2″ spade drill will be used to counterbore the holes a minimum of 1/4″ deep. Practice drilling the 3/16″ diameter hole and counterboring that hole on a piece of scrap wood to make sure the drills are cutting properly and the depth set accurately on the counterbores.
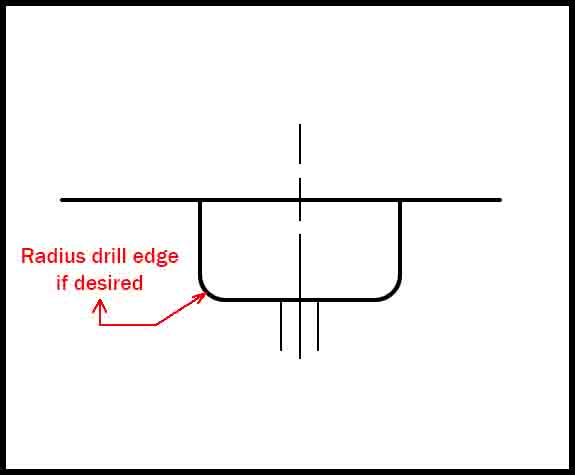
8. Countersink the bottom of the holes to break the sharp edges. Do not countersink the tops of the counterbored holes until they have been painted.
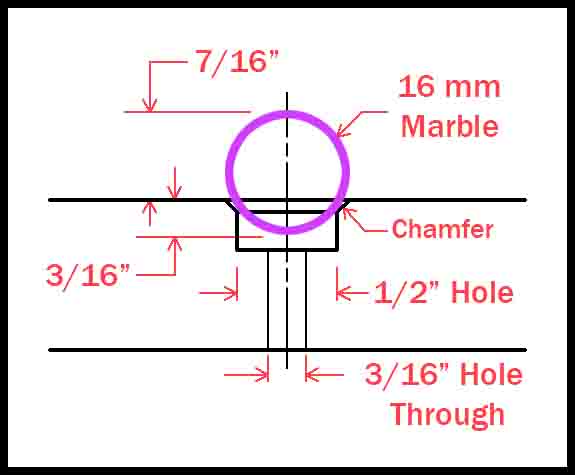
The diagram on the right shows the relationship between a 16mm (5/8″) marble and a 1/2″ hole with a small chamfer for breaking the edge. Enough of the marble is above the surface of the board to easily pick up and move. Any smaller hole than 1/2″and the marble would not be secure. If it was much bigger it would be hard to grasp.
Continue reading about Methods B,C, and D, or go to Finishing the Board
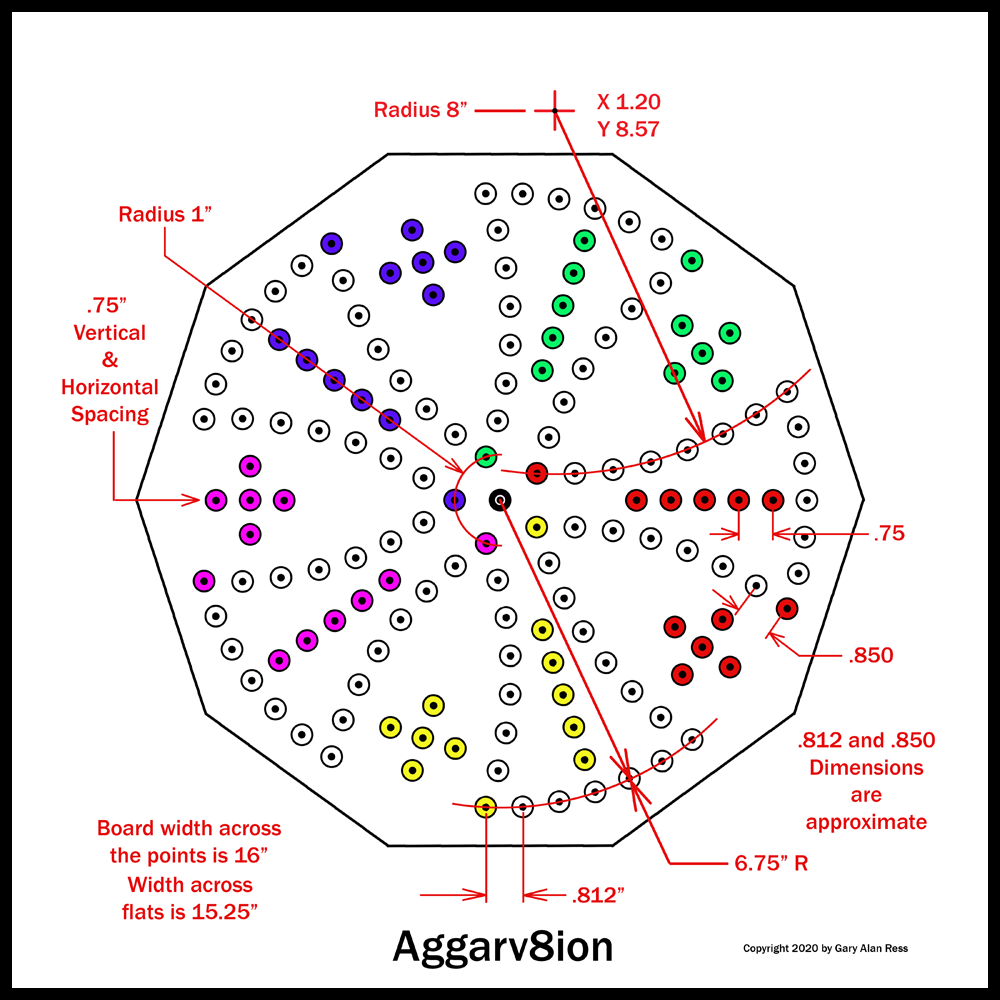
B. The second method for starting a wooden board is to use the blueprint and some drawing instruments to lay out the hole locations. Click the green button to view the blueprint.
If you are laying the board out with a pencil and drawing instruments, the actual design and size may be changed to suit the builder. The blueprint I have drawn is actually a little bit different than the board I made as shown in the left picture above.
Note: The .812 and .850 dimensions are close on the blueprint but not exact since I drew this in Photoshop and not in a CAD program. If you are laying the circles out by hand it will be close enough. Just check that they are all equally distant from each other in each segment for appearance.
Continue reading about Methods C and D or go to Finishing the Board
C. Method 3: Make a plastic drill fixture for multiple boards.
If you are making multiple boards, you may consider making a plastic drill fixture. In Make a game: Octosory there is more information on making a plastic template. The process will be similar, except there are four stations in Octosory and five in Aggarv8ion, where the stations are 72 degrees apart. I laid out the holes with drawing instruments on the plastic template for Octosory, but when making a drill fixture for Aggarv8ion, the paper template below may be used to locate the holes in the drill fixture:
1. To lay out the holes on a plastic drill fixture, first prepare the paper template by piercing all the holes in the template with a push pin, including the two holes that mark the outside edge. Do not pierce the holes in the yellow row. Finally, pierce a tiny hole accurately through the intersection of Line A and the outside edge. Repeat for Line B. (This part will be cut away in Step 3)
2. Tape the paper template onto the plastic piece that will become the drill fixture. Use a scribe and a hammer to transfer the tiny holes onto the fixture, including the two outside holes that form the edge. They will be drilled through later and will be used to mark the edges with a pencil. Make a small prick mark for the two holes that mark the intersection of Lines A and B with the edges.
3. Remove the paper template. Use scissors to cut away a small triangle at the ends of Line A and B on the template where the small pierced holes are located
4. Mark the exact middle of the wooden gameboard with a pencil and tap a push pin in to mark that spot. Attach the paper template to the wooden board by sticking a push pin through the template into the hole in the center. Make sure the template is orientated exactly as desired on the game board. Follow Steps 7-12 at the top of the page to make rotation marks on the game board and verify the accuracy of the template.
5. Enlarge the tiny hole in the center with a small drill bit followed by a 3/16″ drill bit. The drill fixture will rotate around this center hole.
6. Deepen the transferred hole locations in the plastic drill fixture with a center punch, then use a small drill bit to drill a hole through the plastic fixture. Make those holes bigger with a 3/16″ drill bit to finish.
7. Place the plastic fixture on the game board, using a 3/16″ pin or #10 screw in the center hole for the fixture to rotate around. Looking through the holes drilled at the intersection of Lines A and B with the edges, line up the fixture with the pencil marks on the board. They should be exactly in the middle of the holes.
8. Clamp the fixture to the board and transfer all the holes with a 3/16″ drill bit EXCEPT for the two that marked the edge and the two drilled where Line A and B intersects the edge.
9. Repeat Step 8 four more times until all the holes are transferred. When transferring the holes, just drill 1/8″ or a little more deep. Finish drilling all the way through the board after removing the drill fixture for the last time.
10. Finish counterboring and countersinking the holes as described above in Section A.
D. Use a computer with a CAD program.
Use the blueprint to copy the design on a computer using a CAD program, then machine your board on a CNC (Computerized Numerical Control) milling machine. This is the method I used years ago to make some other games such as Orbital Summation and Rainbow Raceway out of plexiglass. The possibilities are endless for creating your own custom board.
Finishing the board.
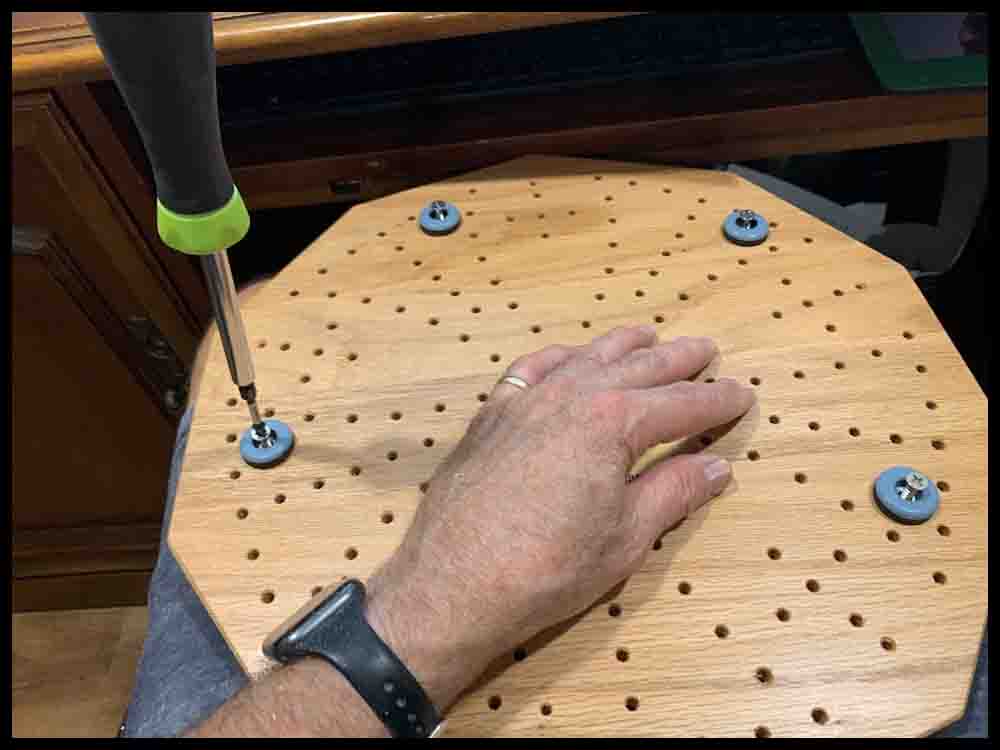
Smooth all the edges with sandpaper. If desired, the edge can be shaped with a router to produce a really attractive game. Lightly sand the top before painting just to get the jagged burrs off the tops of the holes. If you want to add some plastic furniture sliders as feet, lay out where you want them to be located and drill some pilot holes for the screws. If you just want to add felt pads on the bottom, do that after the board is finished.
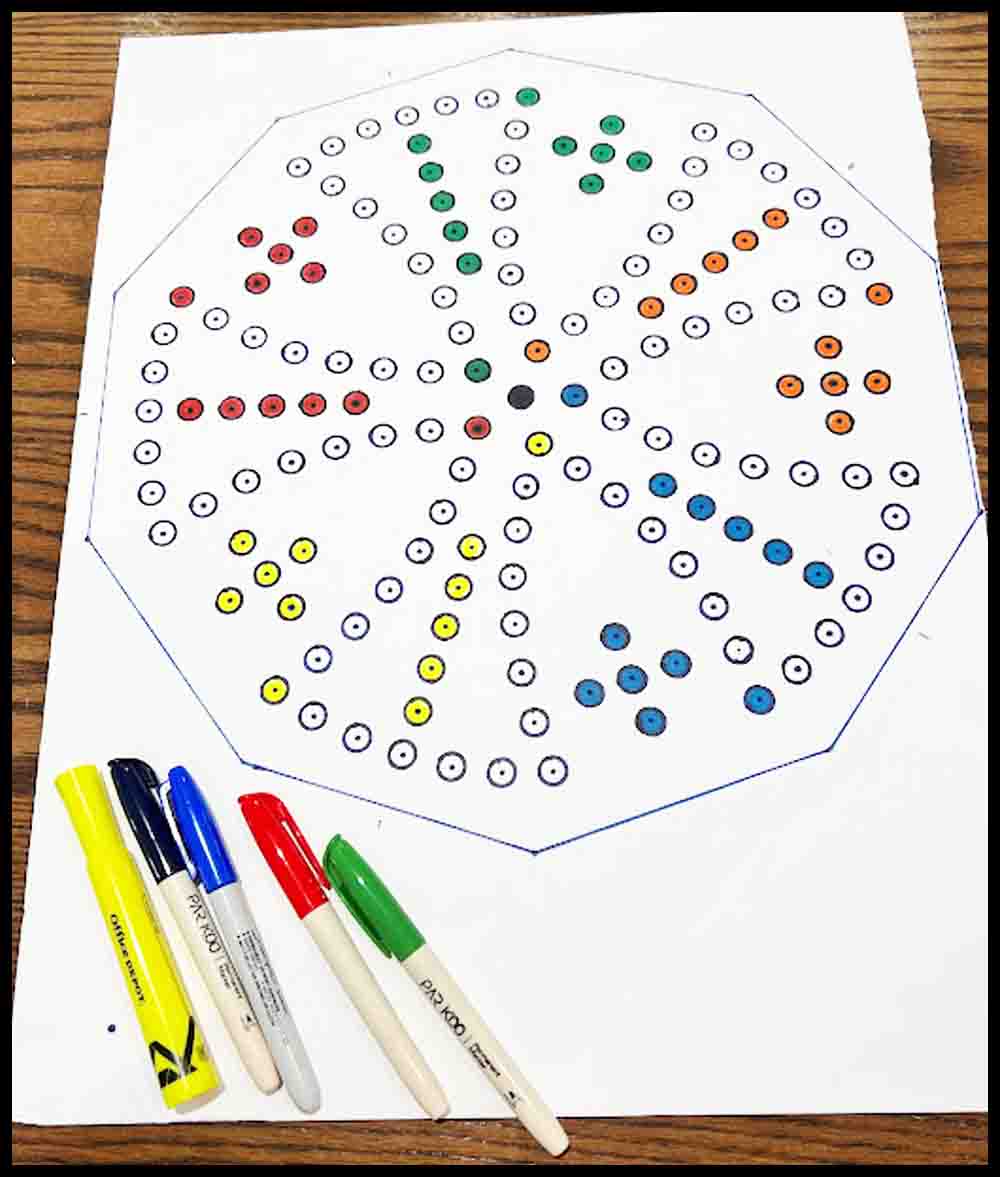
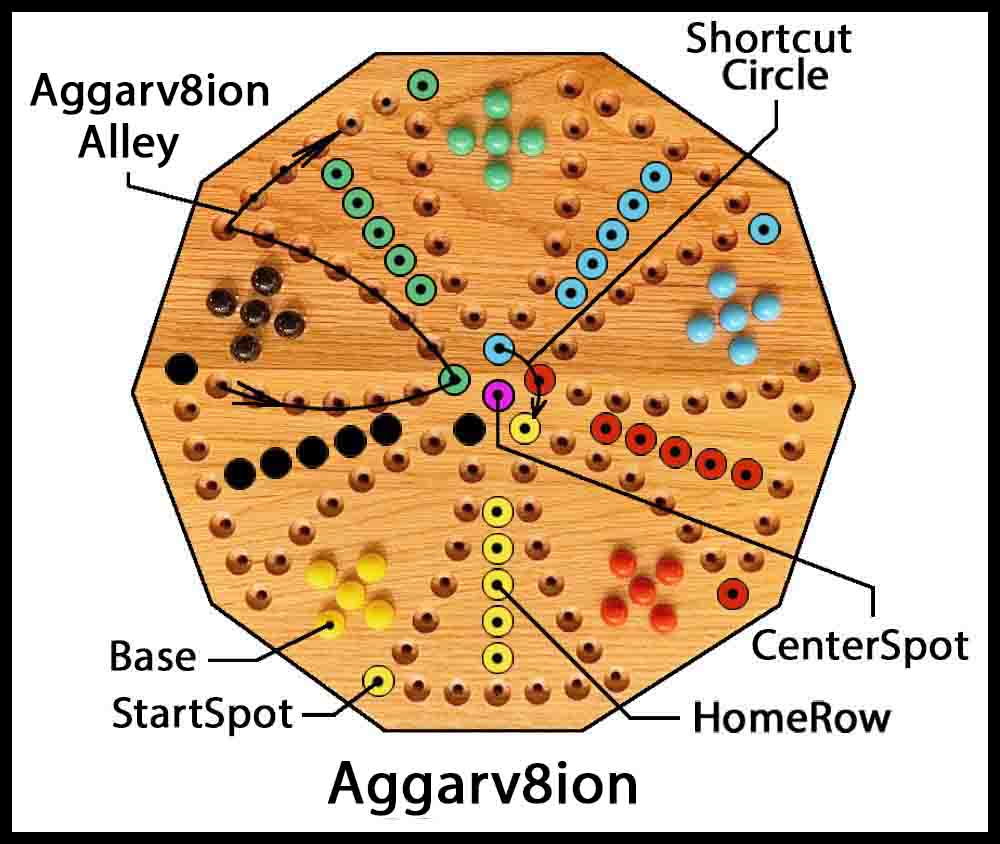
Using the picture on the right as a guide, paint the correct holes in each of the five sections with the colors desired. There are 12 holes that require painting in each section plus the center spot, which should be a different color. I used small bottles of oil paint like the ones sold in hobby stores and gave each of the holes two coats of paint. Some of the lighter colors needed three coats. Countersink the holes after painting to break the edges of the counterbored holes, then use some sandpaper to smooth the whole board.
I tried to apply polyurethane with a brush on the first game I made. BIG MISTAKE! Buy a few cans of polyurethane and spray it on, using up to four or more coats. Follow the directions on the can in regards to drying times and when to lightly sand the finish. I have made wood games using gloss, semi-gloss, and satin. All look nice; your choice.
The Aggarv8ion board is finished!
Print out the rules, buy some 16mm marbles, and obtain a few eight-sided dice. You are ready to play!
Return to the Aggarv8ion page for the rules and instructions.

How I feel after making an Aggarv8ion Game.