The first “DynoDisc” was invented back in the late ’80s when I was playing around with a homemade top, spinning it on the bottom of a soft drink can. I was intrigued that I could keep it spinning by moving the can in my hand in small circles.
Over the years I developed the spinner bowl and spindle, then fine-tuned them to work smoothly.
Marketing Video Made in 2011
Click on the square in the video to watch full screen.
The video shown above was made in 2011 as part of an attempt to sell the DynoDisc through an agent. Sadly it failed. I guess it was too difficult for some testers to handle. Well, you can learn to spin a DynoDisc faster than it takes to master a yoyo!
The button below links to a PDF that will help a person learn how to spin the DynoDisc. It will open in a separate tab.
DynoDisc Introduction Video from 2008
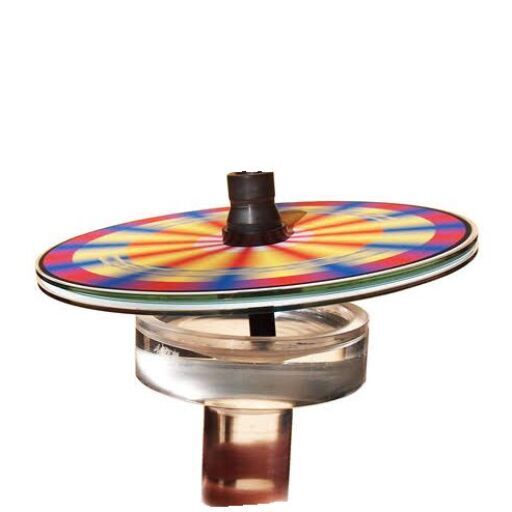
This is the first video I made promoting DynoDisc. I am not a video maker! But I think it gives a good look at what DynoDisc is all about. The discs are held onto the spindle with a small rubber retainer. I had not advanced my design yet to the current one where a plastic nut screws down on the disc. The video is over five minutes long and contains some of the scenes that were used in the shorter video above. The quality is poor due to file size limitations. Click on the square in the controls to see it full screen.
The yellow button below will open a page explaining the principles behind the DynoDisc.
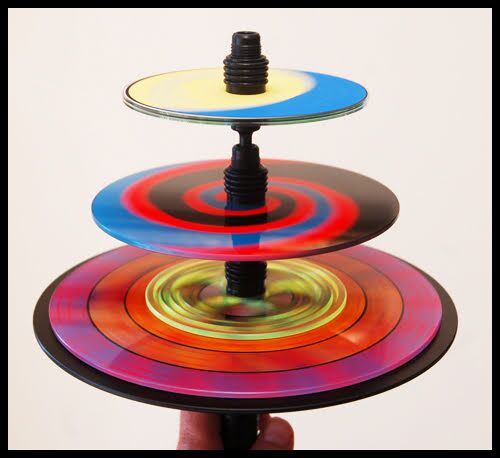
The video below will give a great demonstration of the effects of inertia in making discs stay upright and helps one understand how the discs can be stacked and still work without tumbling over. First the larger and heavier bottom disc is made to spin rapidly. The smaller DynoDisc, that is made up of five CDs stacked together, is then placed on top of the bottom disc, inserting the bottom of the upper spindle into the cavity of the lower disc’s spindle. As the top disc’s spindle contacts the bottom spindle, energy is imparted through friction, causing the top disc to start spinning. As it accelerates, it gradually rises to a vertical position through the forces of inertia and momentum. You may also notice the heavier bottom disc shift a little on its axis in response to the movement of the upper disc. I find it fascinating!

The following picture is a DynoDisc introduction page from 2008
(Quality is poor; click to see)

Discs
I originally made my own plastic discs with a center hole diameter of 1/4″ or 5/16″. I quickly learned that I should make them a standard size for interchangeability in the future. CDs and DVDs have an inside diameter of 15 mm, which is .591″ or close to 19/32″, and there is an unlimited supply of these readily available. So most of my newer discs are based on using a center hole diameter this size. I still make some, though, with a smaller hole diameter of1/4″ or 5/16″ when making spindles out of 2″ or 2 1/2″ machine screws.
If you have a home shop with a drill press, belt sander, bandsaw, and a lathe then you are in business! If you have this equipment then you don’t need my input on how to make stuff. I do recommend using the CD standard dimension of .591 plus a thousandths or two for the inside diameter. Then when you turn the spindle to a dimension of .591″ outside diameter (or a bit less) it will be a slip fit in the disc. You want the disc to go easily onto the spindle but without too much slop.
So most of you are probably saying “I don’t have this stuff! What do I do?? I want to spin NOW!”
Well, get a 3D Printer and learn the software! 🙂 Yeah, right :-(.
Okay, now lets get serious! You don’t have to be a tool and die maker or spend a fortune on fancy equipment to make yourself a working DynoDisc system.
I have posted some instructions in GARS Garage showing you how to make a nice DynoDisc system out of wood or plastic. Just click the button to take you there in another tab!
The following video and picture shows a DynoDisc made out of cardboard with a pencil used as a spindle. I originally showed steps used to make this, but it performed too poorly for a beginner to use as a starter disc. It is rather difficult to spin. I reluctantly deleted the instructions.
The video on the left shows a finished DynoDisc made out of cardboard with another paper layer added on top.
One thing you will notice in person when watching the disc spin is that the different colors will blend together, creating a new color. The camera, because of its shutter speed, will make the colors still appear somewhat separate instead of blended.

Here are some of my DynoDiscs that I have made over the years. Click on the pictures for a bigger view. Notice in the third picture the blank white disc. This is actually made from a piece of fiberboard made for dry erase markers. It is thick enough to spin well on its own. You can try out designs on it, then, if you like it, copy on a piece of cardstock. Or take a paper towel, erase, and start over! The aluminum disc in the video is one of my favorites. It is rather thick with more material concentrated on the outer rim. It spins like a smooth flywheel! Click on the square to watch it full screen.


Although a person can become acquainted with the DynoDisc system using home made discs and spindles, they will not perform as well or as smoothly as a machined spindle with a perfectly rounded disc on top of it. And, of course, you will not be able to “stack” several discs together at one time. I realize it is frustrating if you can’t make your own, but we must wait until some company decides to manufacture the spindles and other components to sell on the open market.
Spindles
I made most of my spindles in a small lathe I bought years ago. I used Acetal plastic rod for the material (anything will work: plastic, nylon, wood,aluminum, brass, etc.). You can buy these materials online. A knowledgeable person could possibly design and build spindles with a 3d printer; however I have never made one this way so I do not know how the plastic will hold up. I sure would like to find out!
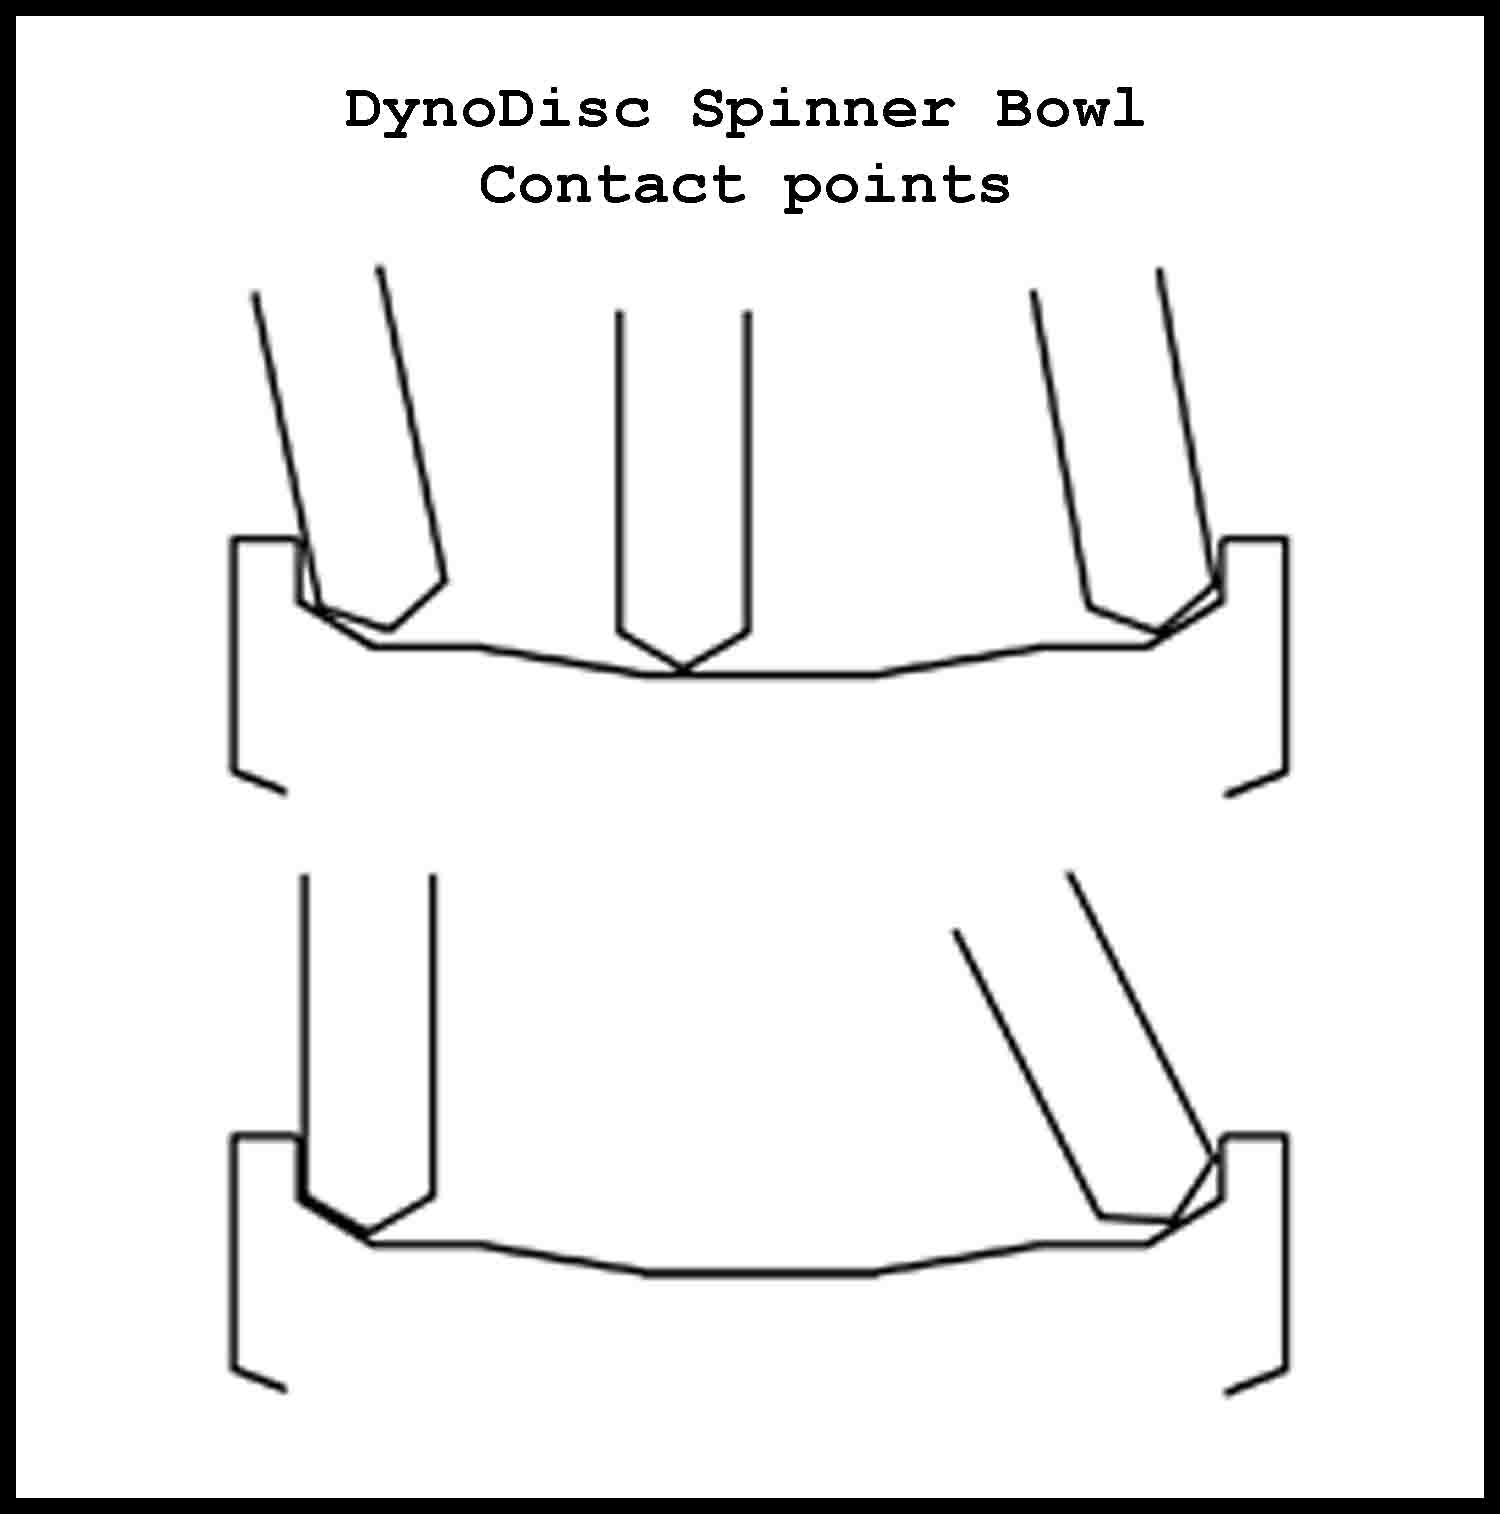
If you click on the blueprint below you will have access to my best designed spindle. The important dimension to be aware of on the spindle is the angle in the internal cavity on top and the angle on the bottom spinning surface. I show 20 degrees but make it whatever your drill angle is in the top cavity. The idea is to have these angles match in order to create friction when stacking multiple discs to optimize the transfer of rotational energy between them. Note the O-ring groove near the bottom. This allows the bottom of the spindle to grip the side of the spinner bowl for faster acceleration.
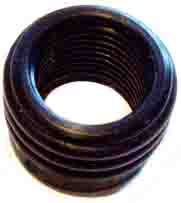
When making a nut to fasten the disc down just duplicate one from the pic on right or look at some in the instruction manual (button above). The important thing is to use an internal 5/8-18 thread. I added grooves for rubber O-Rings on the outside to give a better grip when spinning.
Below is a blueprint of a typical Spindle. The second picture shows a collection I kept in a box for showing to different people. You can see some nice closeups of the spindles, nuts, and spinner bowls. Click on the pictures to open a full size, printable picture. The two videos on the right show my “Mosquito” disc. It is rather difficult to get spinning, but once it gets going it is a blast! You need to spin it very delicately or it will fly out. The video on the far right shows how the same disc performs upside down with a rounded end on the spindle instead of a point. The disc will spin on the ball end and ride around the edge on its own. Fascinating!
Click on the squares to see the videos full size.


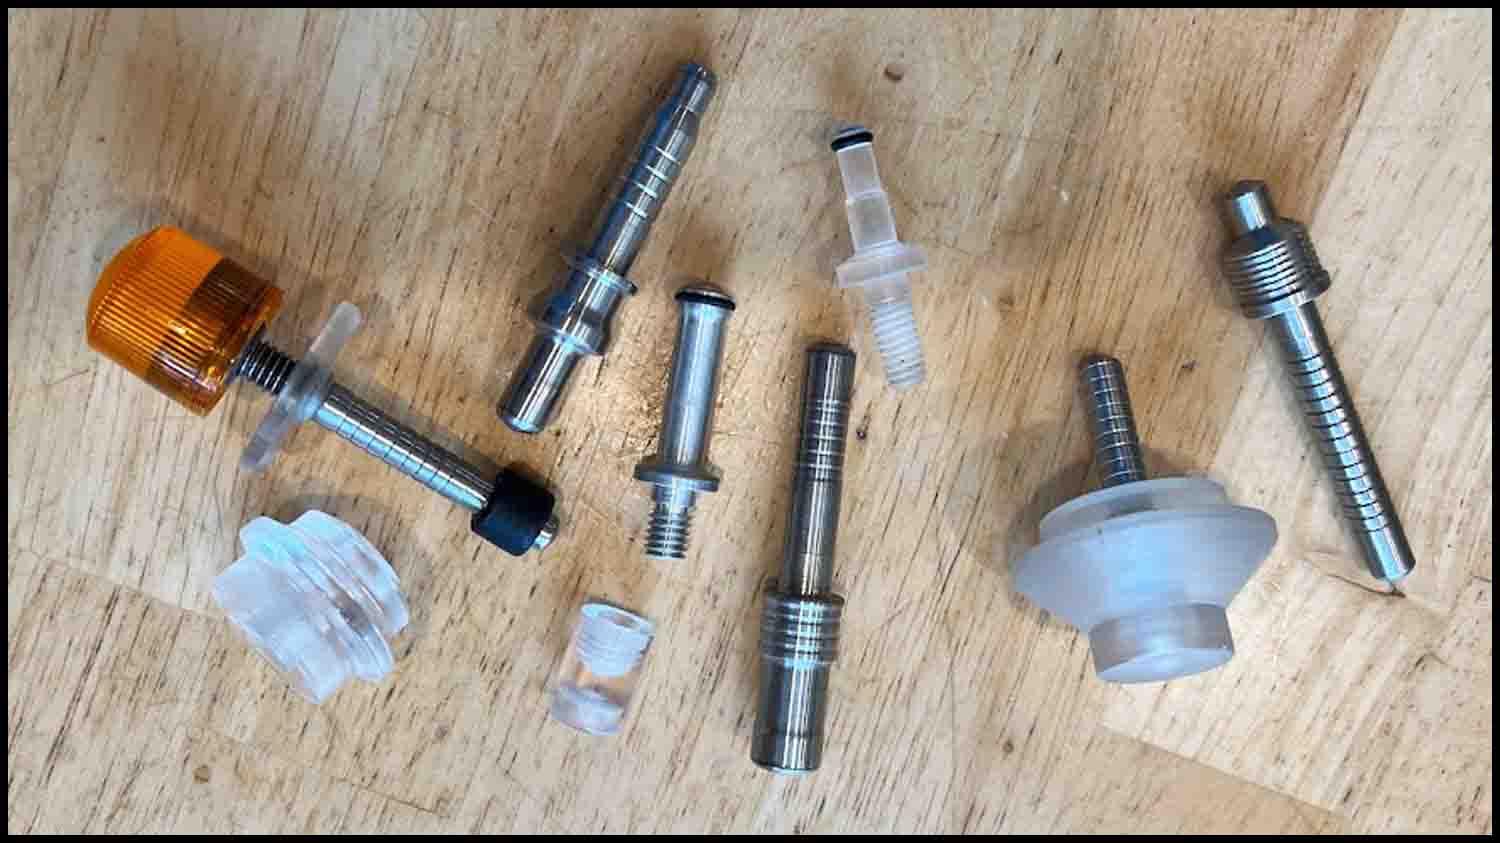
The pictures below show various spindles I have designed over the years. The newest version is on the far left and based on the blueprint shown above. They are made out of nylon (white) and acetal plastic (black). The acetal is extremely easy to machine and is very durable. The two groups of spindles in the middle are made out of acetal, nylon, aluminum, brass, clear plastic rod, and stainless steel. Some use nuts to tighten down the disc on the spindle but others use little rubber washers that press down on the disc. They are easier to make but they don’t work as well. Click on the pictures for a bigger version.


Spinner Bowls
As mentioned at the beginning of this page, the first experience with my DynoDisc creations was simply spinning a clear piece of plastic with a rod through it on the bottom of a soft drink can. From there I figured out how to improve on the shape of a soft drink can and produce a better method of spinning my discs. The shape shown in the blueprint below works very well with the key components: Bowl diameter, depth of bowl wall, and the angle (10 degrees) that slopes down to the center.
I’ve experimented with many variations of this design and they all have different characteristics. Obviously, the larger the interior diameter of the bowl, the faster a disc can possibly turn. However, a smaller size can give a spinner a great overall experience. Click on the pics for a bigger image.


The Future
I am constantly dreaming of updates that can be made to the DynoDisc. In the past I have added a light system on top, spun a disc on a modified flashlight, and made Spinning Bowls the size of dumbells for spinning heavier discs. Quite a workout!
If you spin a disc with holes in it very rapidly you will hear a satisfying roaring sound. Perhaps tweaking the holes or adding some sort of small whistles could produce more enjoyable sounds.
I have also played around with some bigger discs made out of foam to use outdoors with bigger Spinner Bowls and Spindles. They all need some tweaking, however. It would be awesome to get a two foot diameter disc spinning on the beach and toss it back and forth!
But what would be really cool is to take advantage of modern small LED lights to equip a disc that could be controlled from a phone app. A small chip could be fastened on the edge of a disc that would show speed, rpms, even angle deviation on the spinning axis! (I’m pretty sure this can be achieved, but I do not personally have the expertise to do it)
I look forward to people submitting their designs and artwork in the future!


Turn up the volume before clicking me!